1 Jenkins Pipeline
Click here for the source code to this project
Objective: Create a Jenkins pipeline that automatically tests a Python application upon each commit to source control.
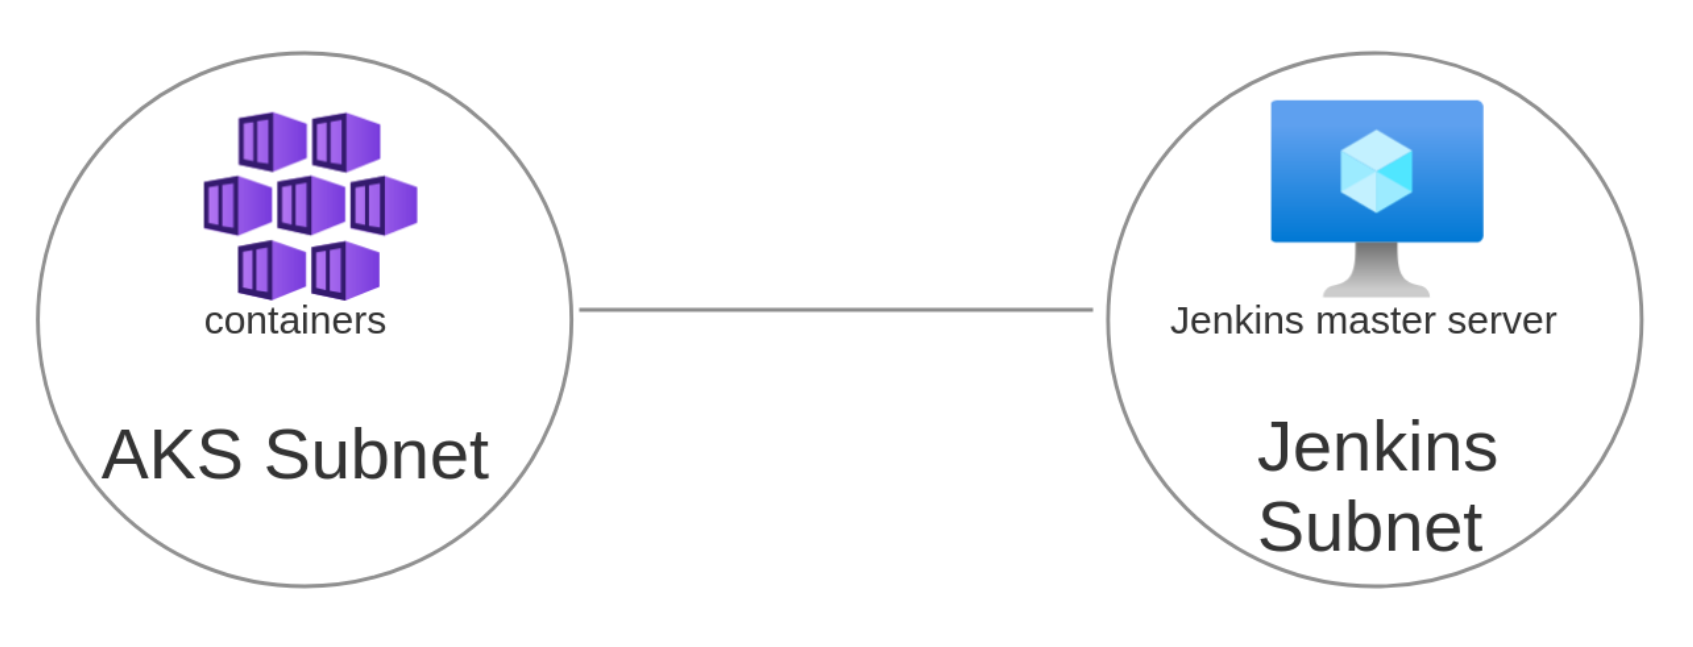
There are an infinite number of paths to complete the objective. This project uses Terraform to programmatically set up the Azure infrastructure for the Jenkins pipeline, ensuring a consistent and reproducible environment. Kubernetes is utilized to spawn agents on behalf of the Jenkins Server, orchestrating these agents to handle CI/CD tasks for the Python application.
The first step involves creating a virtual machine and installing Jenkins on it. An SSH key must be configured to enable SSH access to the virtual machine. A common way to create an SSH key on Linux is by using the ssh-keygen -t rsa -b 4096 command, which generates a new RSA key pair with a length of 4096 bits. By default, this command stores keys in the ~/.ssh directory, with the public key named id_rsa.pub and the private key named id_rsa.
# vm.tf
resource "azurerm_linux_virtual_machine" "jenkins_master_vm" {
  name                = "jenkins-master-vm"
  resource_group_name = azurerm_resource_group.jenkins.name
  location            = azurerm_resource_group.jenkins.location
  size                = "Standard_A1_v2"
  admin_username      = "adminuser"
  network_interface_ids = [
    azurerm_network_interface.jenkins_master_nic.id,
  ]

  admin_ssh_key {
    username   = "adminuser"
    public_key = file("~/.ssh/id_rsa.pub")
  }

  os_disk {
    caching              = "ReadWrite"
    storage_account_type = "Standard_LRS"
  }

  source_image_reference {
    publisher = "Canonical"
    offer     = "0001-com-ubuntu-server-jammy"
    sku       = "22_04-lts"
    version   = "latest"
  }
}
By default, Azure allows all communication between devices within the same virtual network. If communication outside of the virtual network is required, network security rules must be specified. In this project, a network security group with three rules is created to manage external access. The first rule is for SSH on port 22 for secure remote connections. The second rule is for the HTTP management interface on port 8080. The third rule is so that agents can communicate with the Jenkins Server through port 50000 (this is needed because the AKS cluster and Jenkins Server are on different VNets). The network security group, associated with our virtual machine’s network interface, applies the defined access controls to traffic to and from the virtual machine. The network interface code is shown in the upcoming section.
# security_rules.tf

# Create a network security group
resource "azurerm_network_security_group" "jenkins_nsg" {
  name                = "jenkins-nsg"
  location            = azurerm_resource_group.jenkins.location
  resource_group_name = azurerm_resource_group.jenkins.name
}

# Create a security rule to allow SSH
resource "azurerm_network_security_rule" "ssh" {
  name                        = "SSH"
  priority                    = 1000
  direction                   = "Inbound"
  access                      = "Allow"
  protocol                    = "Tcp"
  source_port_range           = "*"
  destination_port_range      = "22"
  source_address_prefix       = "*"  # You should restrict this to known IPs for better security
  destination_address_prefix  = "*"
  resource_group_name         = azurerm_resource_group.jenkins.name
  network_security_group_name = azurerm_network_security_group.jenkins_nsg.name
}

# Create a security rule to allow web access for management
resource "azurerm_network_security_rule" "jenkins_web" {
  name                        = "JenkinsWeb"
  priority                    = 1010
  direction                   = "Inbound"
  access                      = "Allow"
  protocol                    = "Tcp"
  source_port_range           = "*"
  destination_port_range      = "8080"
  source_address_prefix       = "*"
  destination_address_prefix  = "*"
  resource_group_name         = azurerm_resource_group.jenkins.name
  network_security_group_name = azurerm_network_security_group.jenkins_nsg.name
}

# Create a security rule that allows agents to communicate with the the Jenkins Server
resource "azurerm_network_security_rule" "jenkins_agent" {
  name                        = "JenkinsAgent"
  priority                    = 1020
  direction                   = "Inbound"
  access                      = "Allow"
  protocol                    = "Tcp"
  source_port_range           = "*"
  destination_port_range      = "50000"
  source_address_prefix       = "*"  # Consider restricting to specific IPs for security
  destination_address_prefix  = "*"
  resource_group_name         = azurerm_resource_group.jenkins.name
  network_security_group_name = azurerm_network_security_group.jenkins_nsg.name
}

# Associate the network security group with the network interface
resource "azurerm_network_interface_security_group_association" "jenkins_nic_nsg_association" {
  network_interface_id      = azurerm_network_interface.jenkins_master_nic.id
  network_security_group_id = azurerm_network_security_group.jenkins_nsg.id
}
Jenkins can be installed using a package manager, or it can be run as a Docker container. This project uses the azurerm_virtual_machine_extension resource to install Docker on the jenkins_master_vm virtual machine and to run the Jenkins LTS image as a container. Additionally, the Azure CLI and Azure Kubernetes Service (AKS) CLI are installed to interact with the Kubernetes Cluster from the Jenkins Server.
# vm.tf
resource "azurerm_virtual_machine_extension" "setup" {
  name                 = "setupDockerAndJenkins"
  virtual_machine_id   = azurerm_linux_virtual_machine.jenkins_master_vm.id
  publisher            = "Microsoft.Azure.Extensions"
  type                 = "CustomScript"
  type_handler_version = "2.0"

  settings = jsonencode({
    commandToExecute = <<-EOT
      sudo apt-get update && \
      sudo apt-get install -y ca-certificates curl gnupg lsb-release && \
      sudo install -m 0755 -d /etc/apt/keyrings && \
      curl -fsSL https://download.docker.com/linux/ubuntu/gpg | sudo gpg --dearmor -o /etc/apt/keyrings/docker.gpg && \
      sudo chmod a+r /etc/apt/keyrings/docker.gpg && \
      echo deb [arch=$(dpkg --print-architecture) signed-by=/etc/apt/keyrings/docker.gpg] https://download.docker.com/linux/ubuntu $(lsb_release -cs) stable | sudo tee /etc/apt/sources.list.d/docker.list > /dev/null && \
      sudo apt-get update && \
      sudo apt-get install -y docker-ce docker-ce-cli containerd.io docker-buildx-plugin docker-compose-plugin && \
      sudo docker run -d -p 8080:8080 -p 50000:50000 --restart=always --name=jenkins-master -v jenkins-data:/var/jenkins_home jenkins/jenkins:lts
      curl -sL https://aka.ms/InstallAzureCLIDeb | sudo bash && \
      sudo az aks install-cli --client-version 1.27.7
    EOT
  })
}
As you can see, there is a long list of post-deployment commands to be executed in the azurerm_virtual_machine_extension resource. Each command adds additional time to the deployment, decreases manageability, and increases the chance for errors. Using custom images is recommended to provide more speedy and reliable setups.
The azurerm_linux_virtual_machine resource requires the creation of an azurerm_network_interface resource for networking capabilities. After defining an azurerm_network_interface resource, its ID should be specified in the network_interface_ids attribute of the azurerm_linux_virtual_machine resource.
# vm.tf
resource "azurerm_network_interface" "jenkins_master_nic" {
  name                = "jenkins-master-nic"
  location            = azurerm_resource_group.jenkins.location
  resource_group_name = azurerm_resource_group.jenkins.name

  ip_configuration {
    name                          = "internal"
    subnet_id                     = azurerm_subnet.jenkins_subnet.id
    private_ip_address_allocation = "Dynamic"
    public_ip_address_id          = azurerm_public_ip.jenkins_master_public_ip.id
  }
}

resource "azurerm_public_ip" "jenkins_master_public_ip" {
  name                = "jenkins-master-public-ip"
  location            = azurerm_resource_group.jenkins.location
  resource_group_name = azurerm_resource_group.jenkins.name
  allocation_method   = "Dynamic"
}
In this example, a dynamic IP address is assigned to the azurerm_network_interface. In a production environment, the use of a static IP address is likely preferred. A Dynamic IP address is chosen here to showcase a solution to a common issue. Dynamic IP addresses are not assigned until they are directly attached to a device. This causes the issue of not being able to immediately see the IP address allocated to the network interface after running terraform apply. To remedy this issue, the azurerm_public_ip data source is utilized.
# vm.tf
data "azurerm_public_ip" "jenkins_master_ip" {
  name                = azurerm_public_ip.jenkins_master_public_ip.name
  resource_group_name = azurerm_linux_virtual_machine.jenkins_master_vm.resource_group_name
  depends_on          = [azurerm_linux_virtual_machine.jenkins_master_vm]
}
The azurerm_public_ip data source is used in an output value to display the Jenkins Server web interface URL.
# outputs.tf
output "jenkins_master_url" {
  value       = "http://${data.azurerm_public_ip.jenkins_master_ip.ip_address}:8080"
  description = "The URL to access the Jenkins master web interface."
}
Here is the output value that appears after running the terraform apply command:

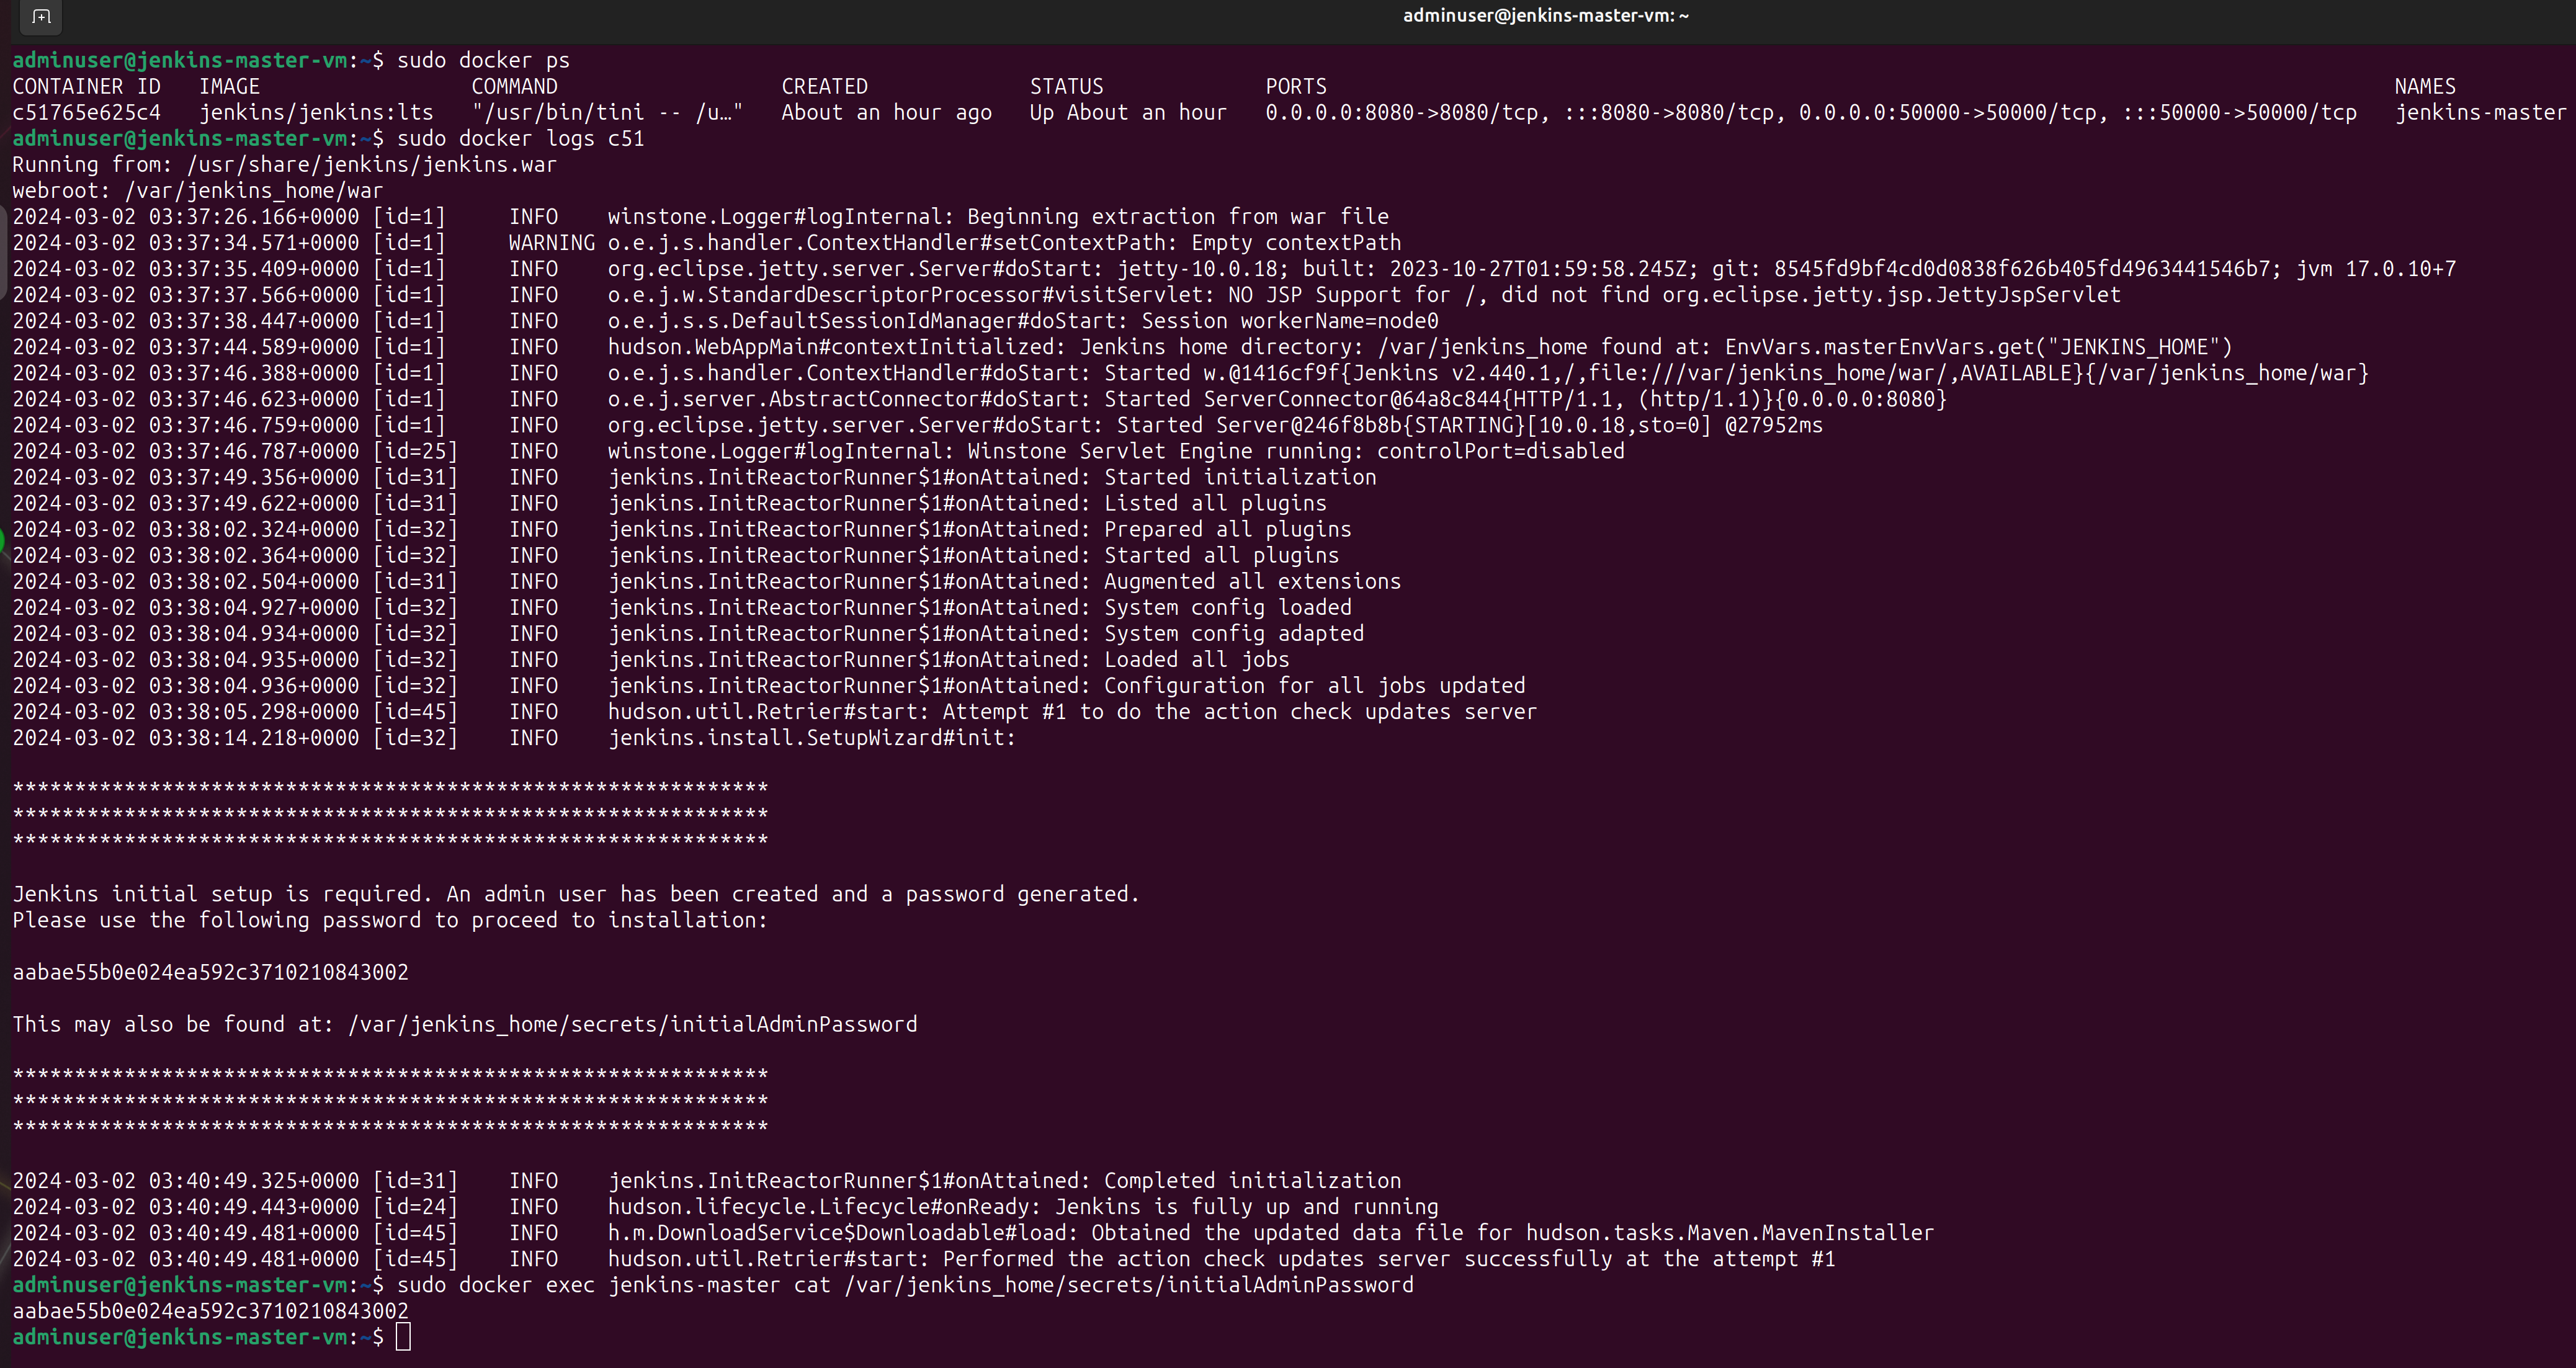
After navigating to the outputted jenkins_master_url, the first Jenkins “Getting Started” screen appears where input of the initial admin password is prompted. Since the Jenkins Server is running as a Docker container, the initial admin password can be retrieved from container logs or directly from the container’s filesystem as shown below.
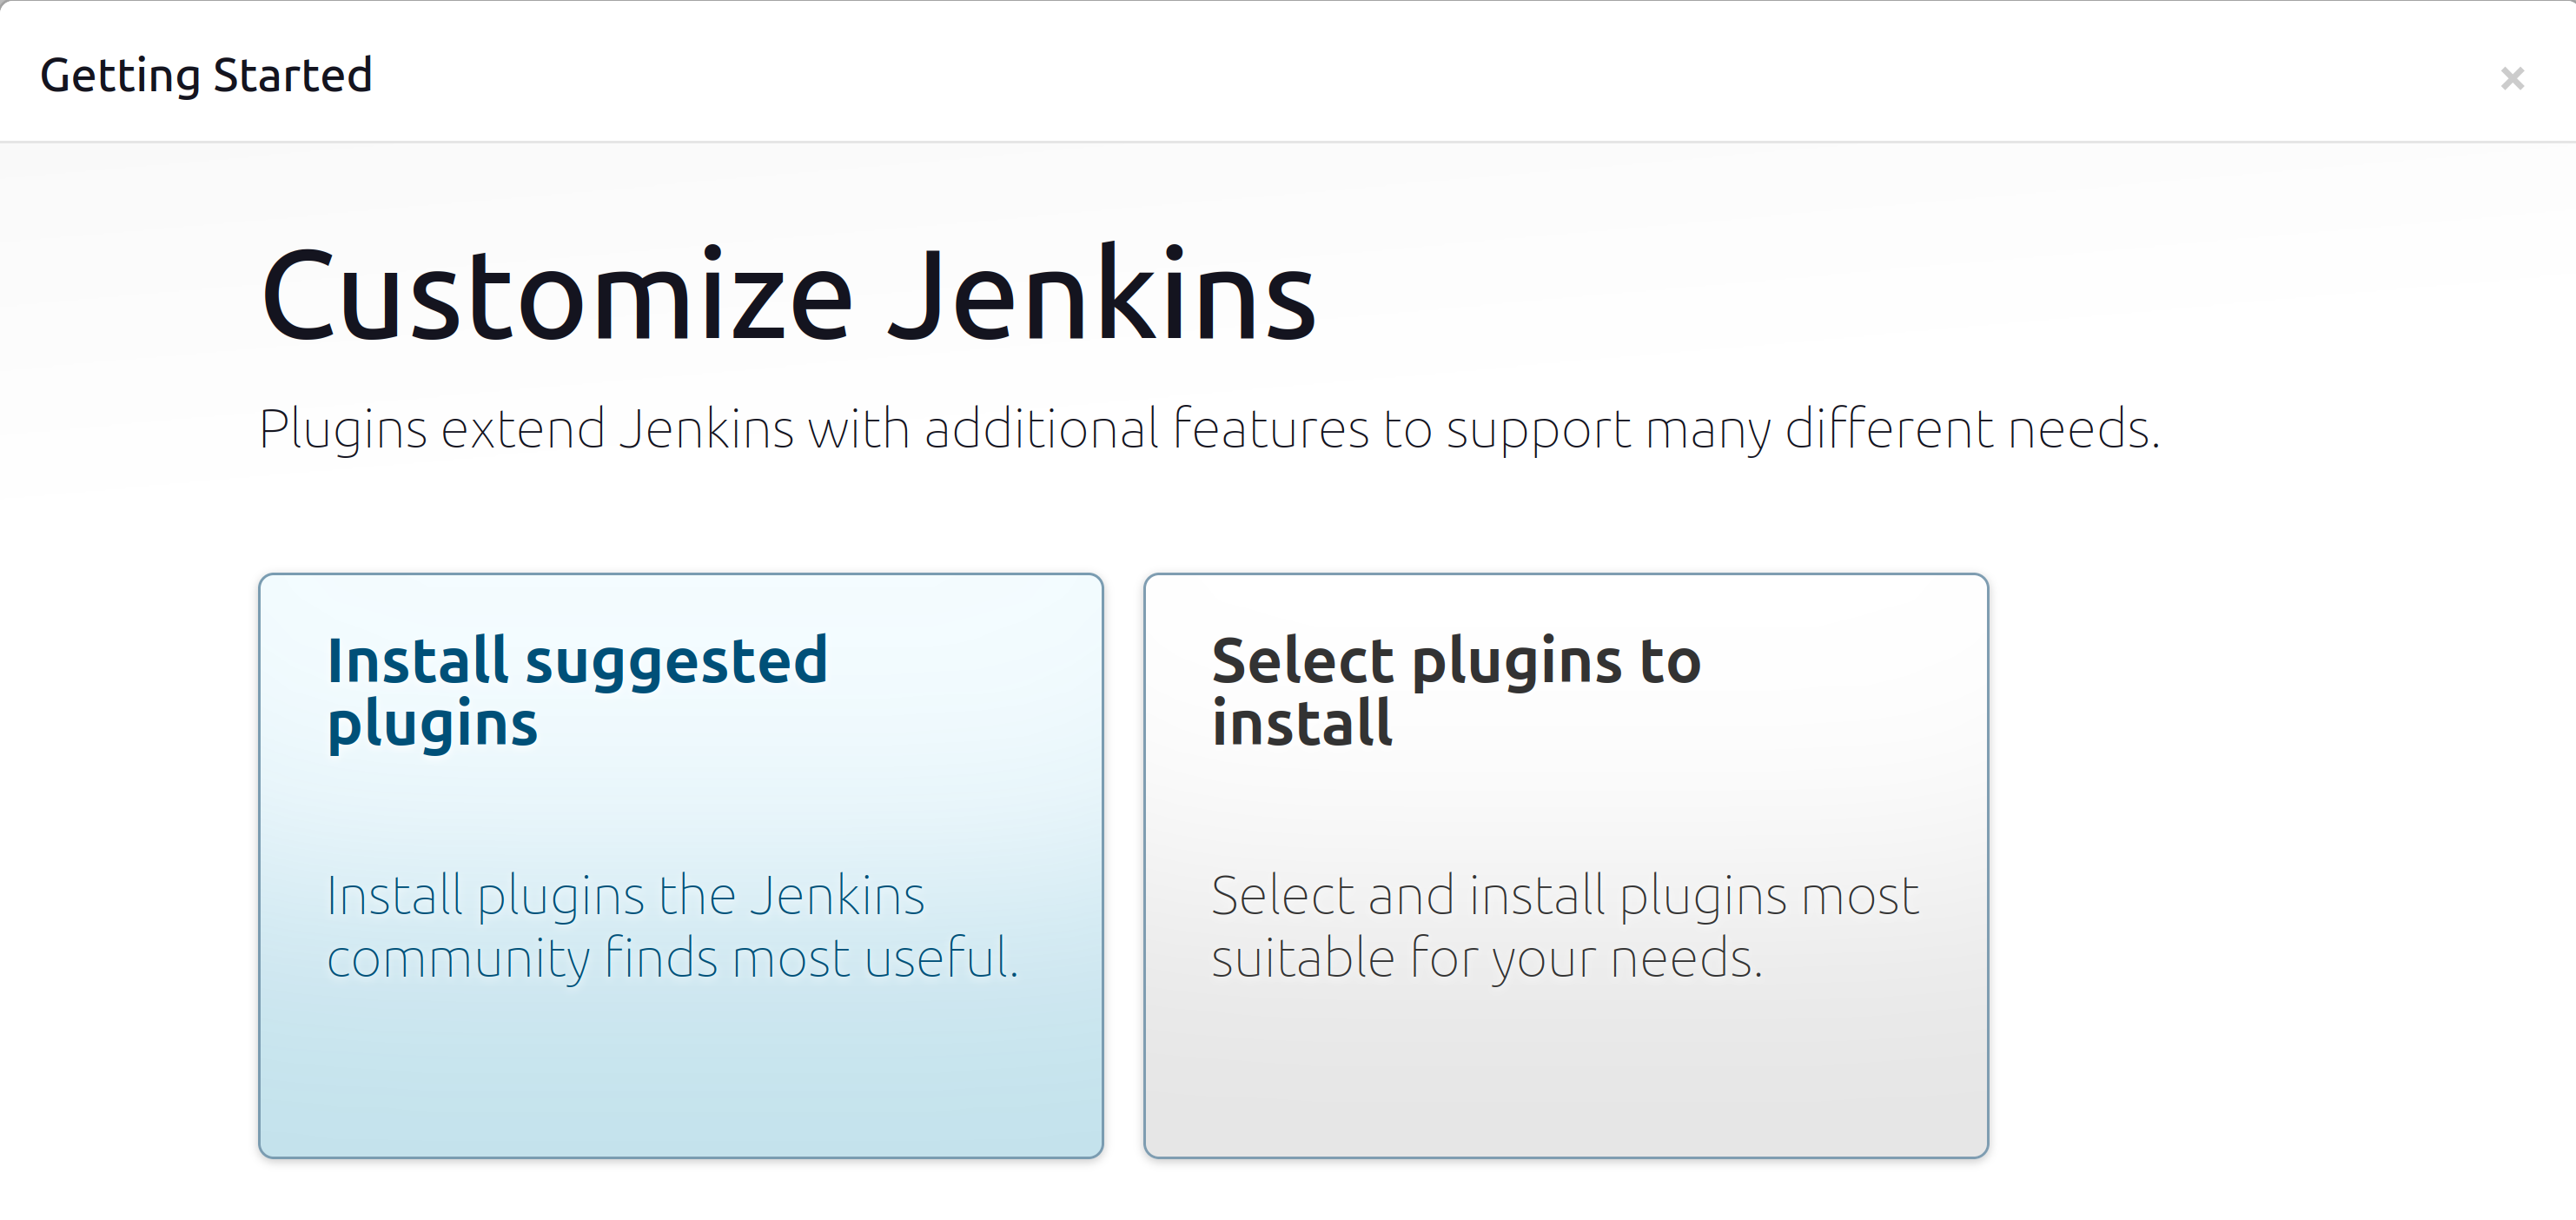
After pasting the initial admin password into the input box and pressing “Continue,” creation of an account and installation of plugins are prompted. The Jenkins setup wizard is self-explanatory. In this project, installation of the “suggested plugins” is chosen. Additional plugins can be installed at any time.
Now that the Jenkins master server is configured, it’s time to configure a Kubernetes Cluster. The Jenkins master server will provision agents as pods in the Kubernetes Cluster to execute each stage of a CI/CD pipeline. The Azure Kubernetes Service (AKS) is chosen because it removes most of the complexity associated with setting up a Kubernetes Cluster.
# aks.tf
resource "azurerm_kubernetes_cluster" "devtest_aks" {
  name                = "devtest-aks"
  location            = azurerm_resource_group.jenkins.location
  resource_group_name = azurerm_resource_group.jenkins.name
  dns_prefix          = "devtest-aks-dns"
  kubernetes_version  = "1.27.7"
  private_cluster_enabled = true

  default_node_pool {
    name                = "default"
    vm_size             = "Standard_DS2_v2"
    enable_auto_scaling = true
    min_count           = 1
    max_count           = 3
    type                = "VirtualMachineScaleSets"
    vnet_subnet_id      = azurerm_subnet.aks_subnet.id
  }

  identity {
    type = "SystemAssigned"
  }

  network_profile {
    network_plugin    = "kubenet"
    service_cidr      = "10.0.3.0/24"
    dns_service_ip    = "10.0.3.10"
    network_policy    = "calico"
    load_balancer_sku = "standard"
    outbound_type     = "loadBalancer"
  }

  tags = {
    Environment = "Development"
  }
}
Once the cluster is configured, ensuring the ability to use kubectl to interact with the cluster from the Jenkins master server virtual machine is necessary. Generation of a kubeconfig file is required to make authenticated requests to the kube-apiserver. This can be done by running the following commands:


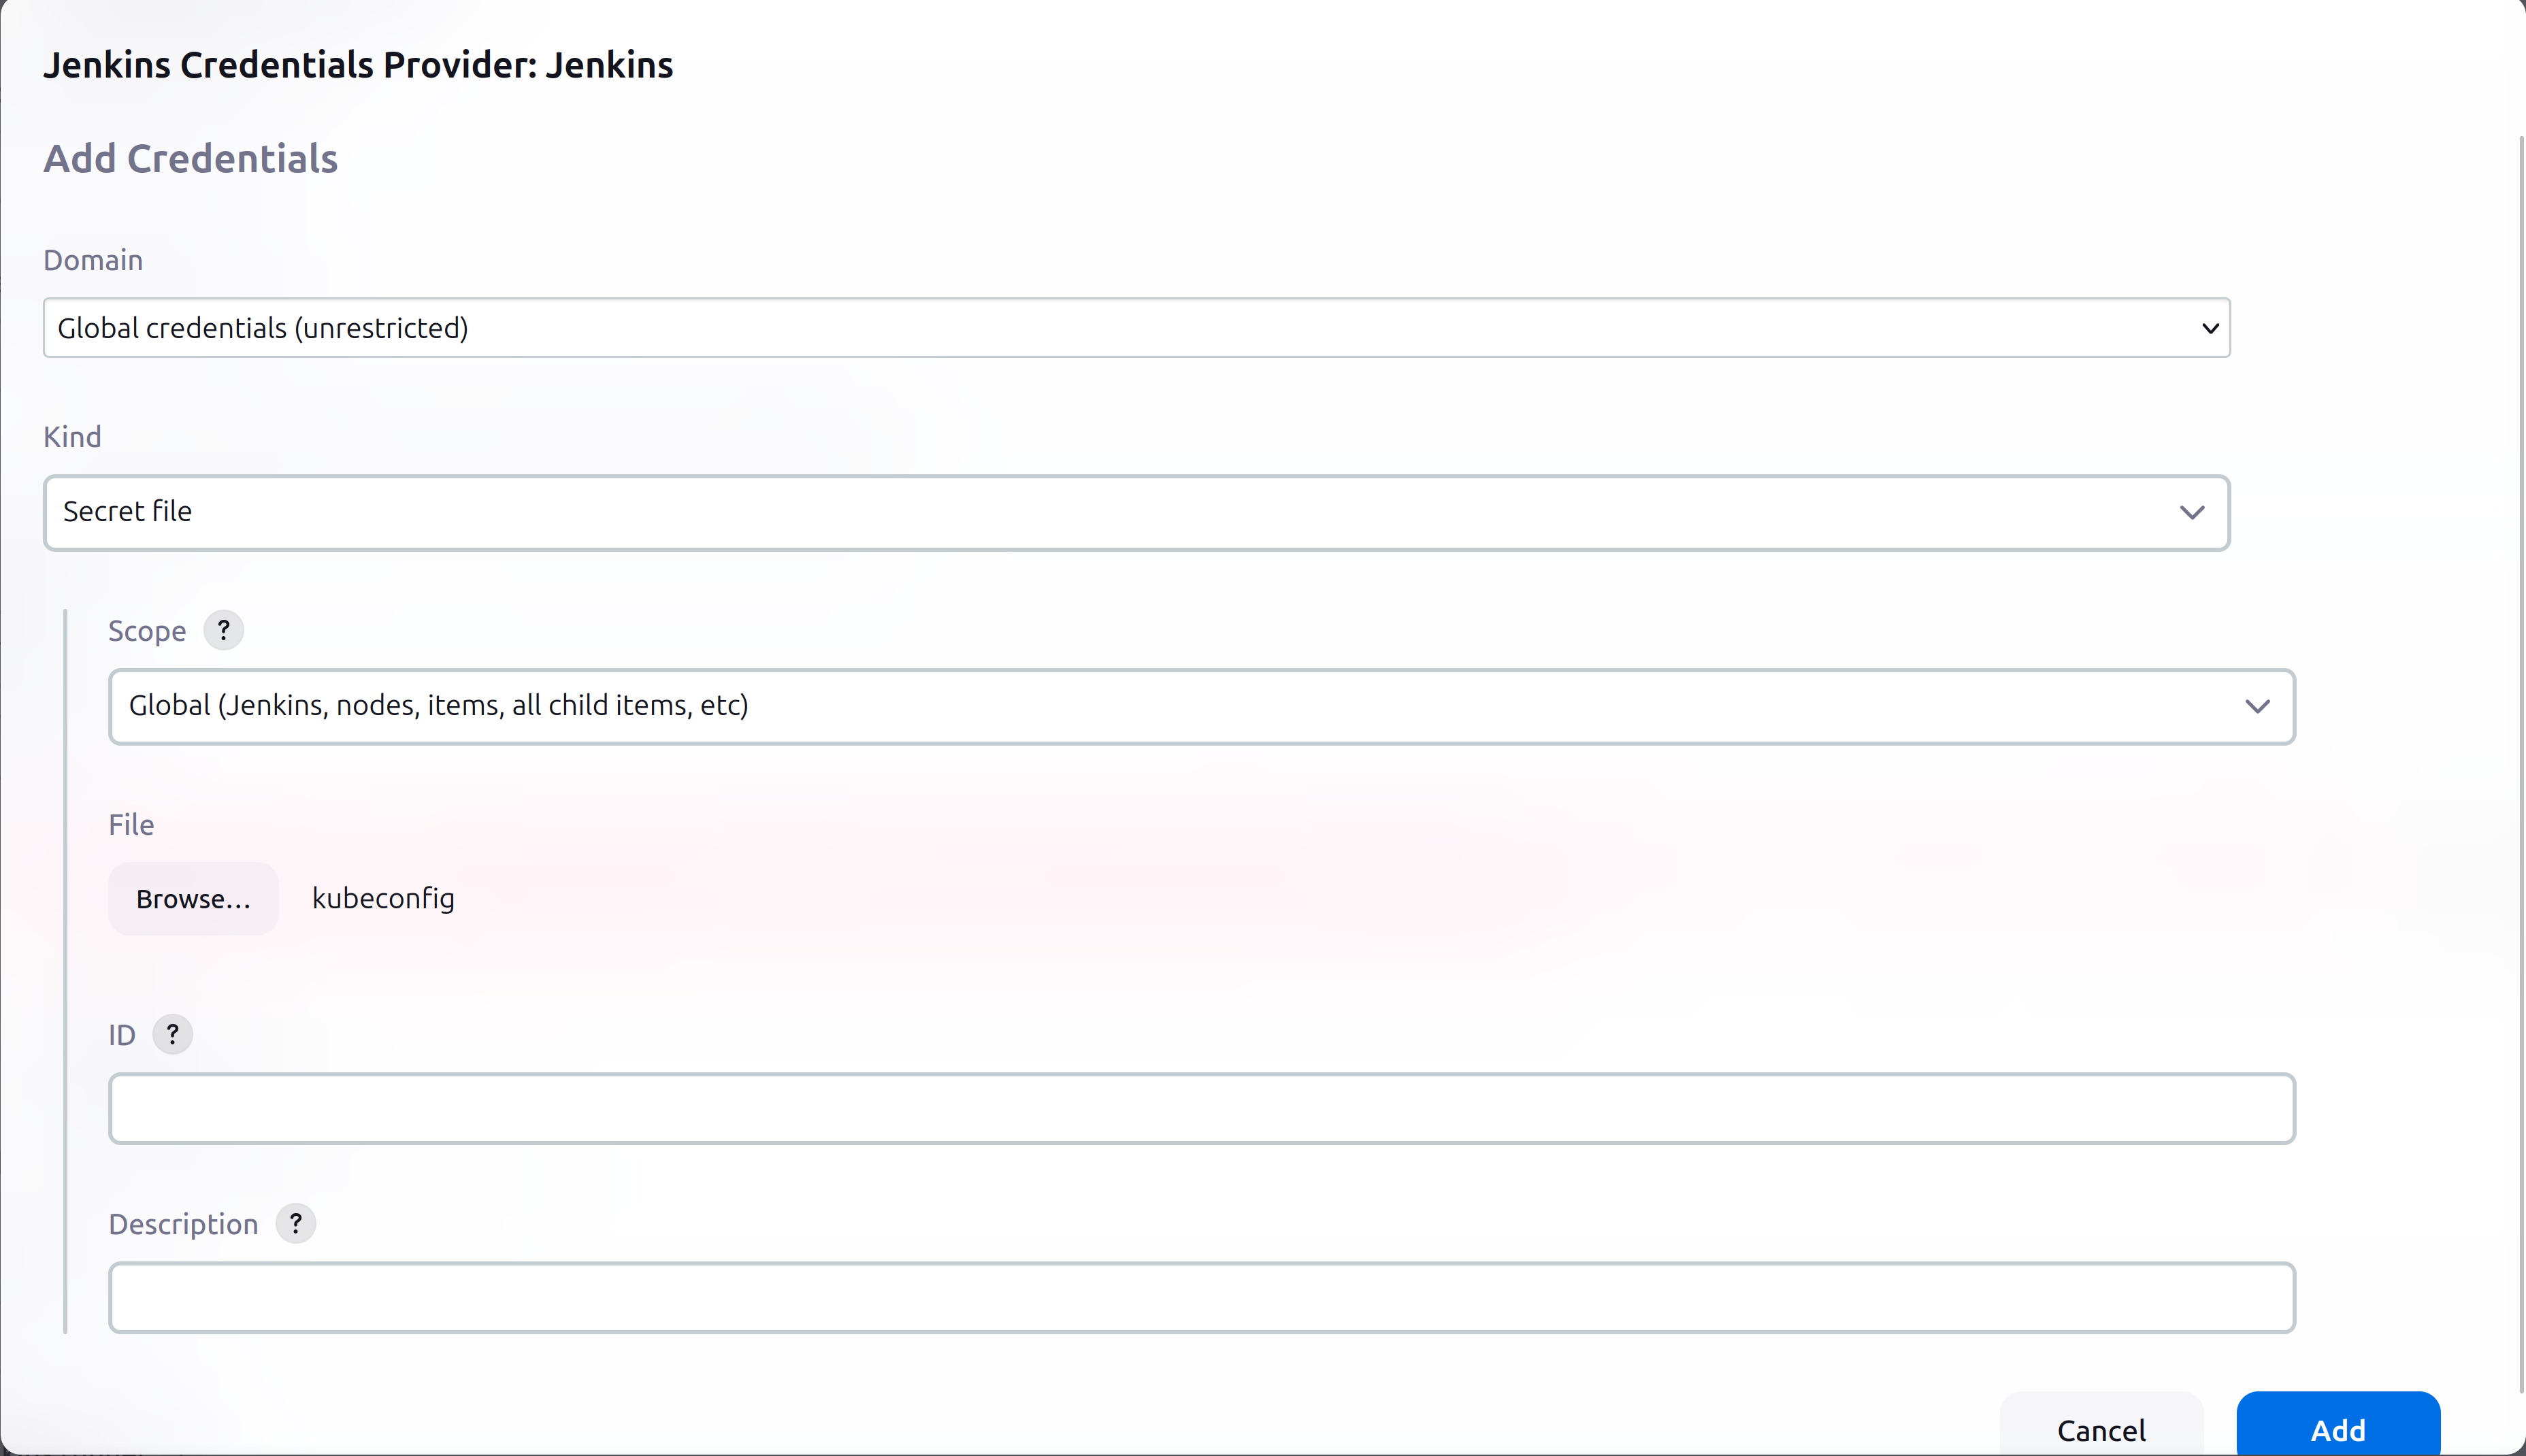
Open up the newly created .kube/config file and copy all of the contents into a separate file named kubeconfig on the same device managing the Jenkins master server from. Now that the cluster is set up, it’s time to integrate it with Jenkins. This can be done using the Kubernetes plugin and a bit of configuration. From the Jenkins Server web interface, the Kubernetes plugin is installed. Navigating to Dashboard > Manage Jenkins > Clouds > New cloud and selecting “Kubernetes” as the type is done. A name for the cloud is chosen. The Kubernetes URL (The URL of the Kubernetes API server) is listed within the kubeconfig file. It is pasted into the Kubernetes URL field. Next, scrolling down to the credentials section and clicking the “+Add” button then selecting the Jenkins credential provider is done. “Secret file” in the Kind field is selected and then the kubeconfig file is selected as shown in the picture below.
After adding the Kubernetes URL field and specifying the credentials, the “Test Connection” button should indicate that it has “Connected to Kubernetes v1.27.7” as shown below. This configuration is saved after verifying the test was successful.

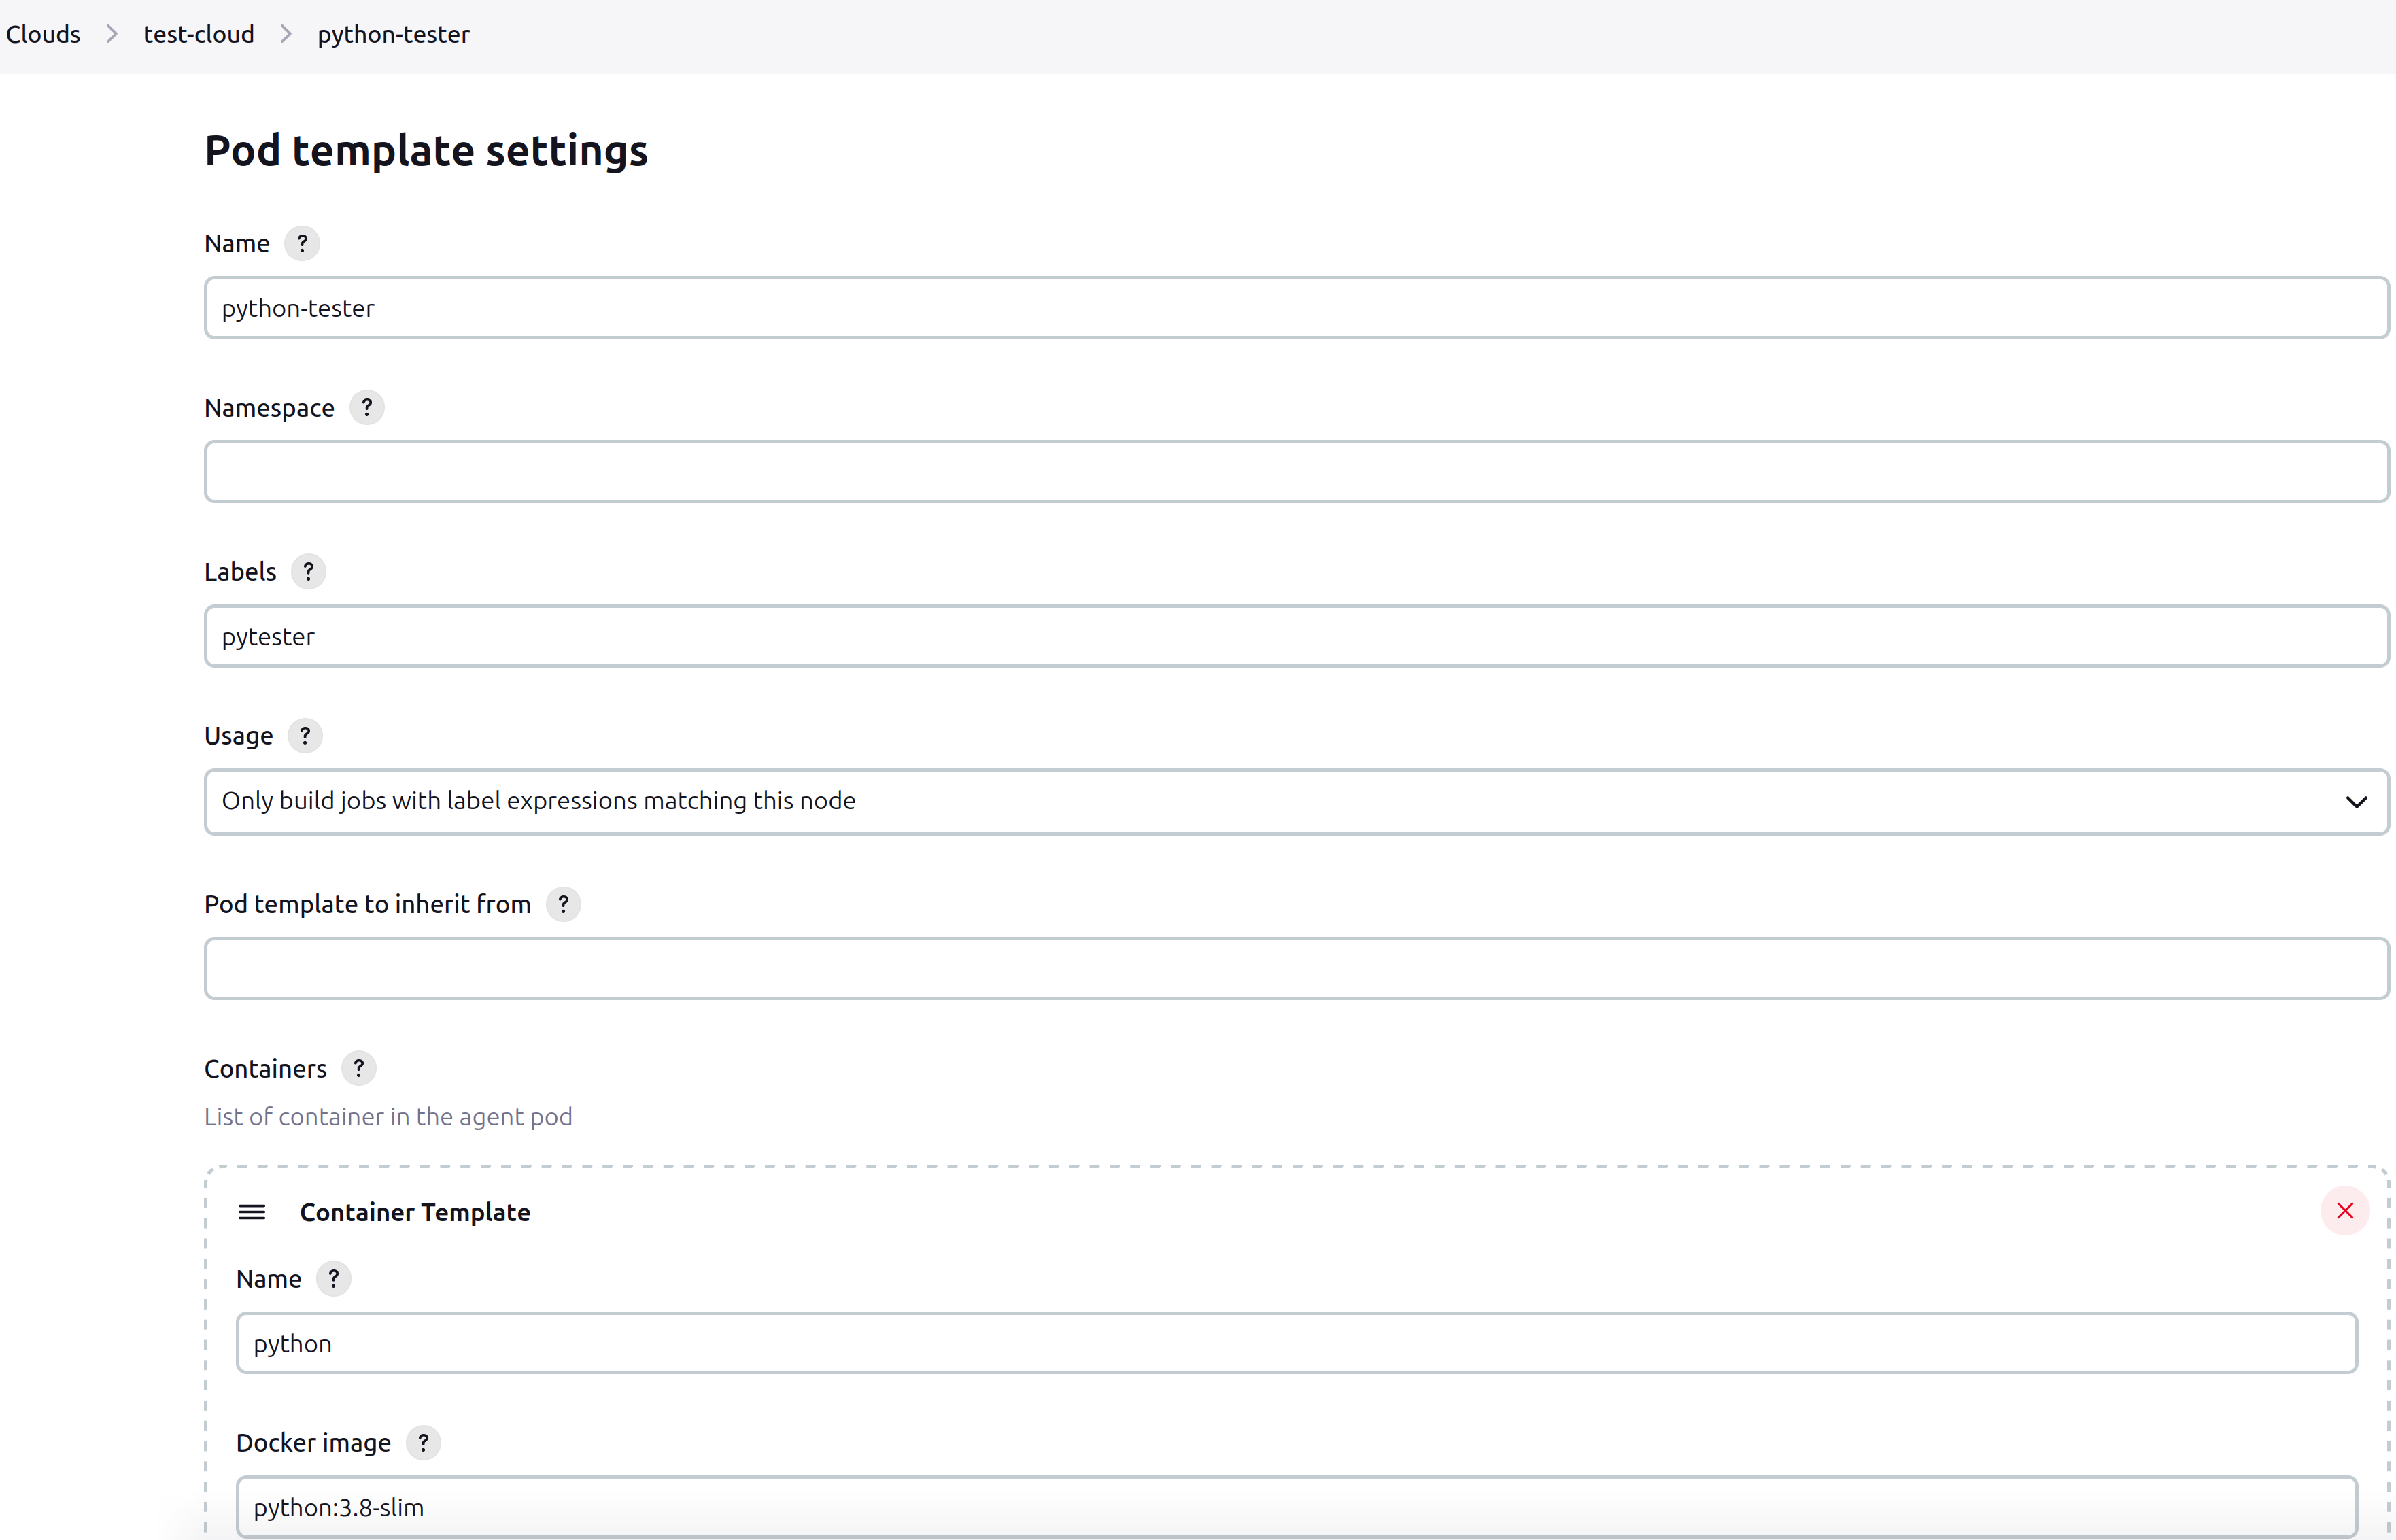
At this point, pod templates within the cloud can be created. A pod template is a blueprint for creating Kubernetes pods to be used for CI/CD tasks. The goal of this project is to create a Jenkins pipeline that tests a Python application. A pod template using the settings found in the screenshot below is created. All other settings are left default. Note the tag name as this will be used when setting up the Jenkins CI/CD pipeline.
The pipeline is finally ready to be implemented for the python application.
// Jenkinsfile
pipeline {
agent { label 'pytester' }
stages {
stage('Checkout') {
steps {
checkout scm
}
}
stage('Setup Python Environment') {
steps {
container('python') {
sh '''
python3 -m venv myenv
. myenv/bin/activate
pip install -r requirements.txt
'''
}
}
}
stage('Run Tests') {
steps {
container('python') {
// replace pipeline with the name of your pipeline
sh '''
. myenv/bin/activate
export PYTHONPATH=$PYTHONPATH:/home/jenkins/agent/workspace/pipeline
pytest tests
'''
}
}
}
stage('Build') {
steps {
container('python') {
sh 'echo "In a real project, this might be where you package your Python app"'
}
}
}
stage('Deploy') {
steps {
container('python') {
sh 'echo "Deploying application (simulated)"'
// In a real project, add deployment scripts here
}
}
}
}
post {
success {
script {
setBuildStatus('Build successful', 'SUCCESS')
}
}
failure {
script {
setBuildStatus('Build failed', 'FAILURE')
}
}
}
}
// Define the function to set build status
void setBuildStatus(String message, String state) {
def repo = 'https://github.com/ssstier/workflow'
step([
$class: 'GitHubCommitStatusSetter',
reposSource: [$class: 'ManuallyEnteredRepositorySource', url: repo],
contextSource: [$class: 'ManuallyEnteredCommitContextSource', context: 'CI/Jenkins'],
errorHandlers: [[$class: 'ChangingBuildStatusErrorHandler', result: 'UNSTABLE']],
statusResultSource: [$class: 'ConditionalStatusResultSource', results: [
[$class: 'AnyBuildResult', message: message, state: state]
]]
])
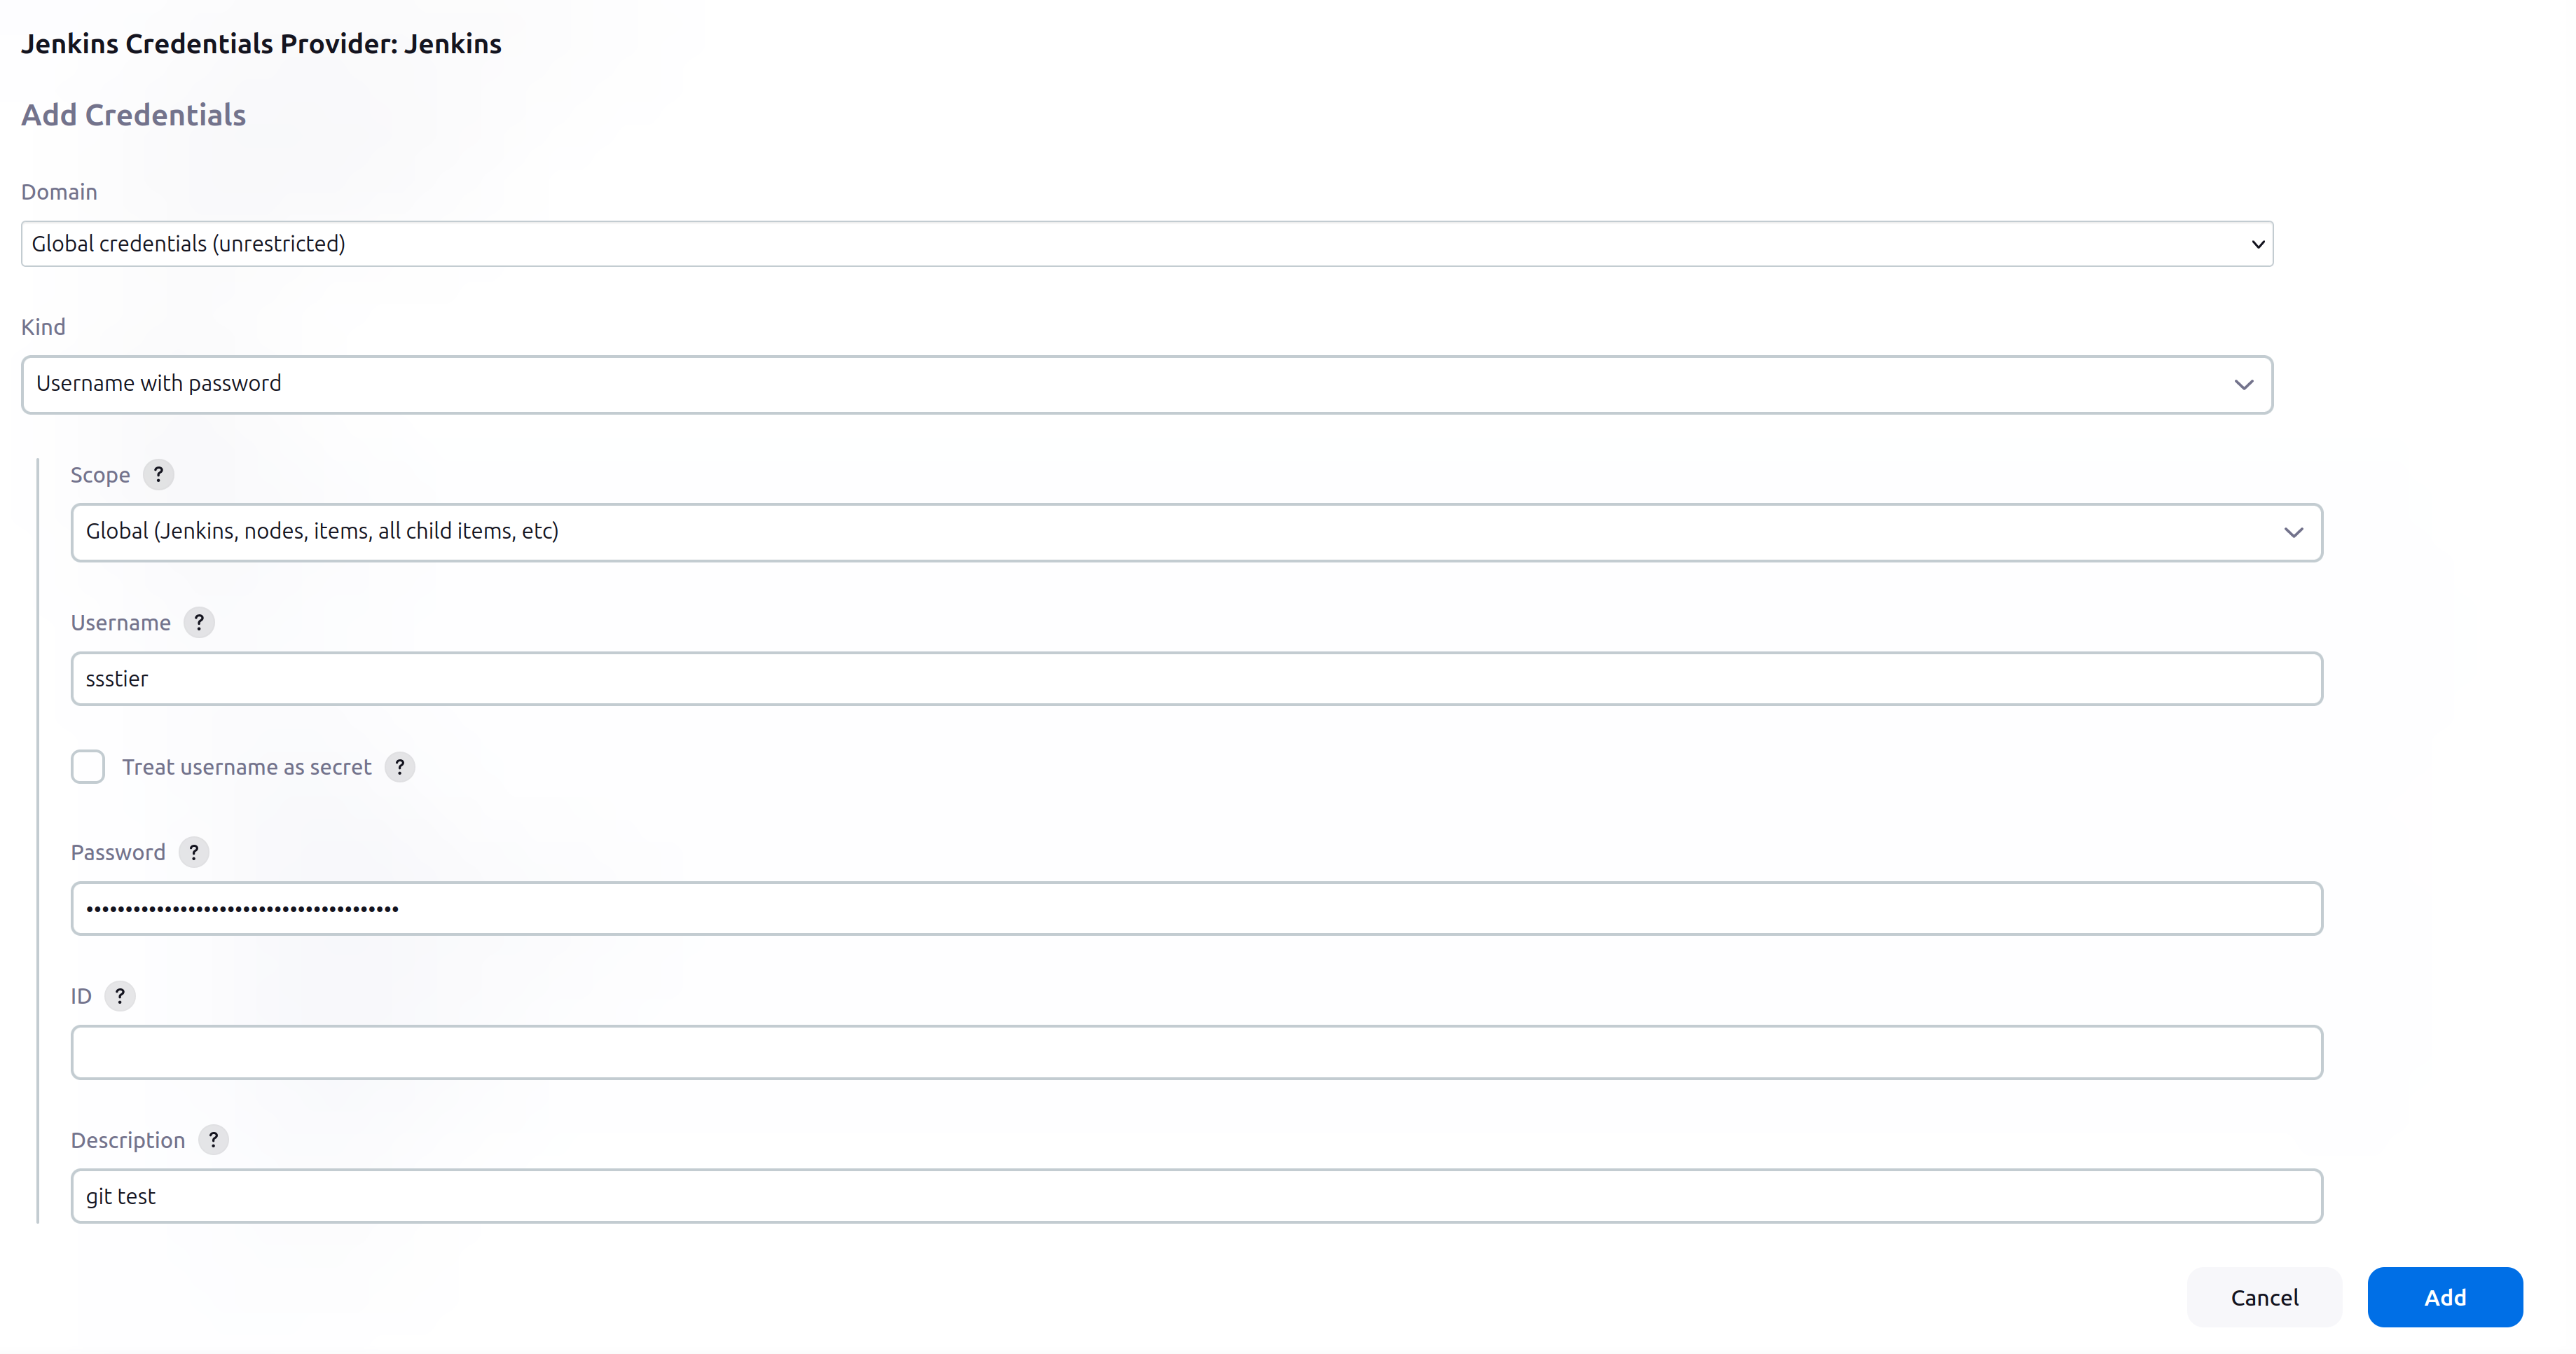
}Typically, a Jenkinsfile is placed inside the root of the repository, though it can be anywhere as long as the Jenkins master server is informed of its path. To make full use of the pipeline, two types of authentication need to be configured. The first type of authentication enables Jenkins to access the repository for tasks such as checking out code if the repository is private, which can be done using Github username and password authentication (where the password is a personal access token). The second type of authentication is used to interact with the Github API for operations like updating commit statuses.
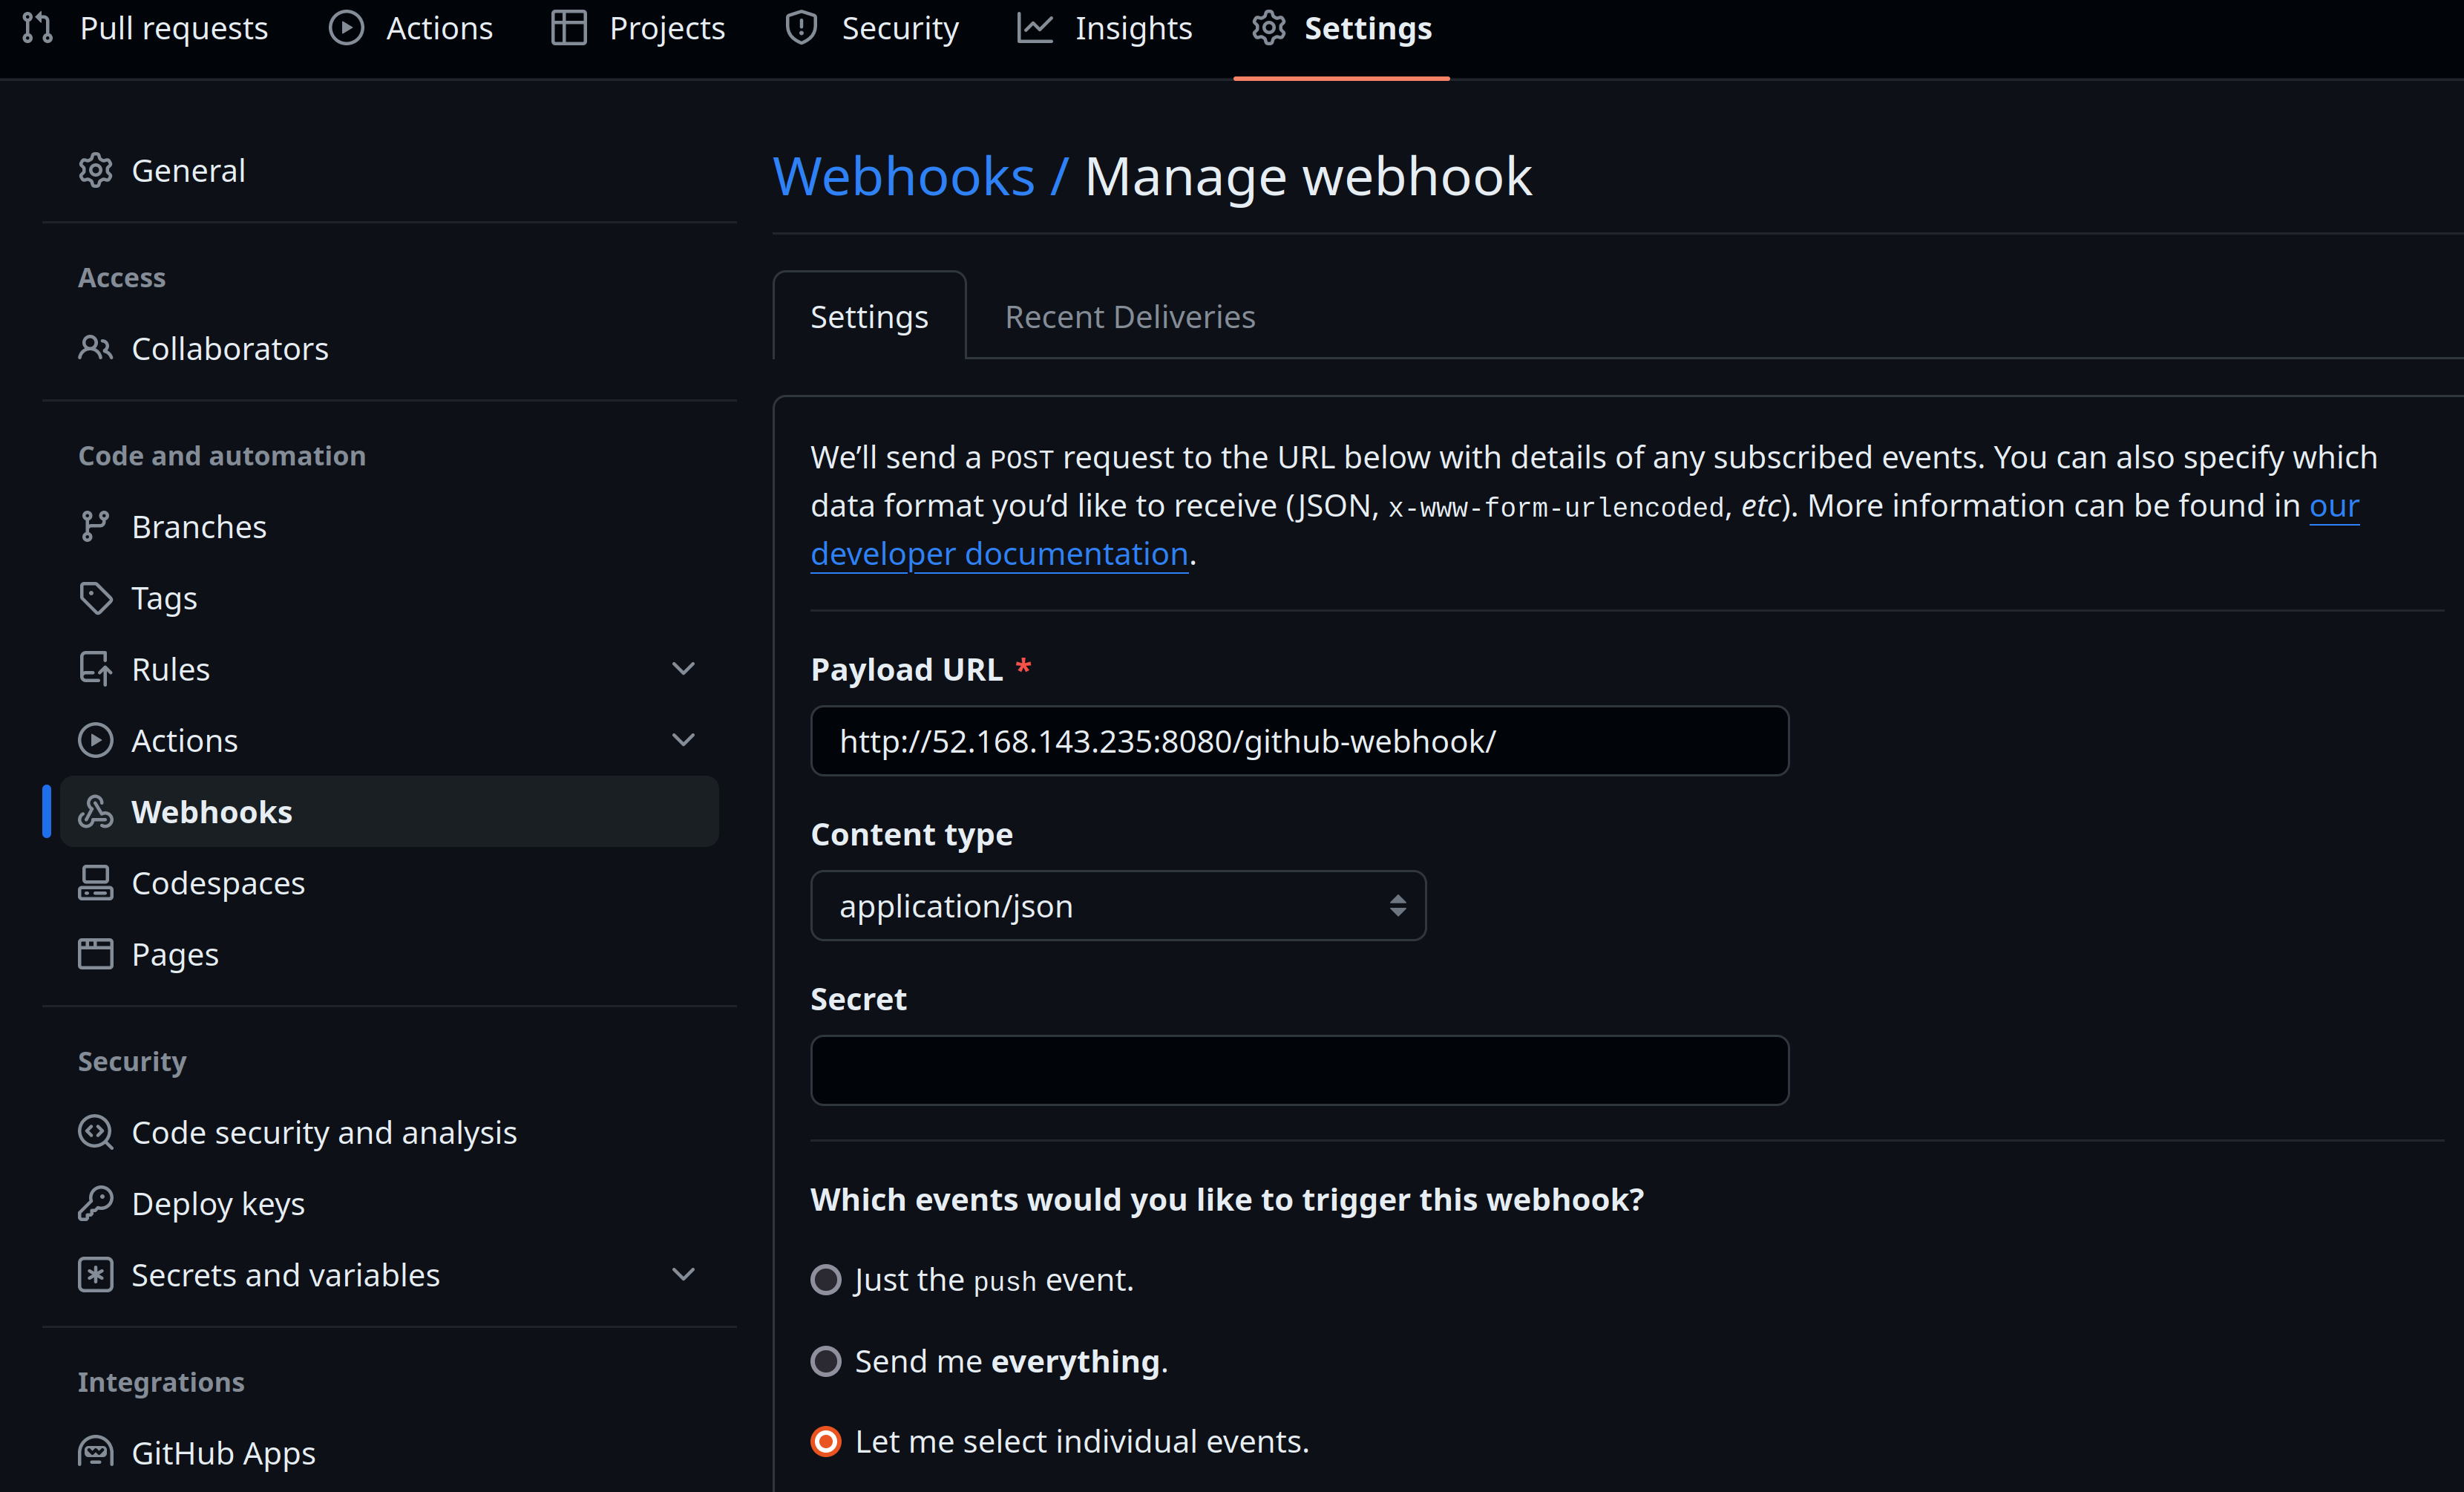
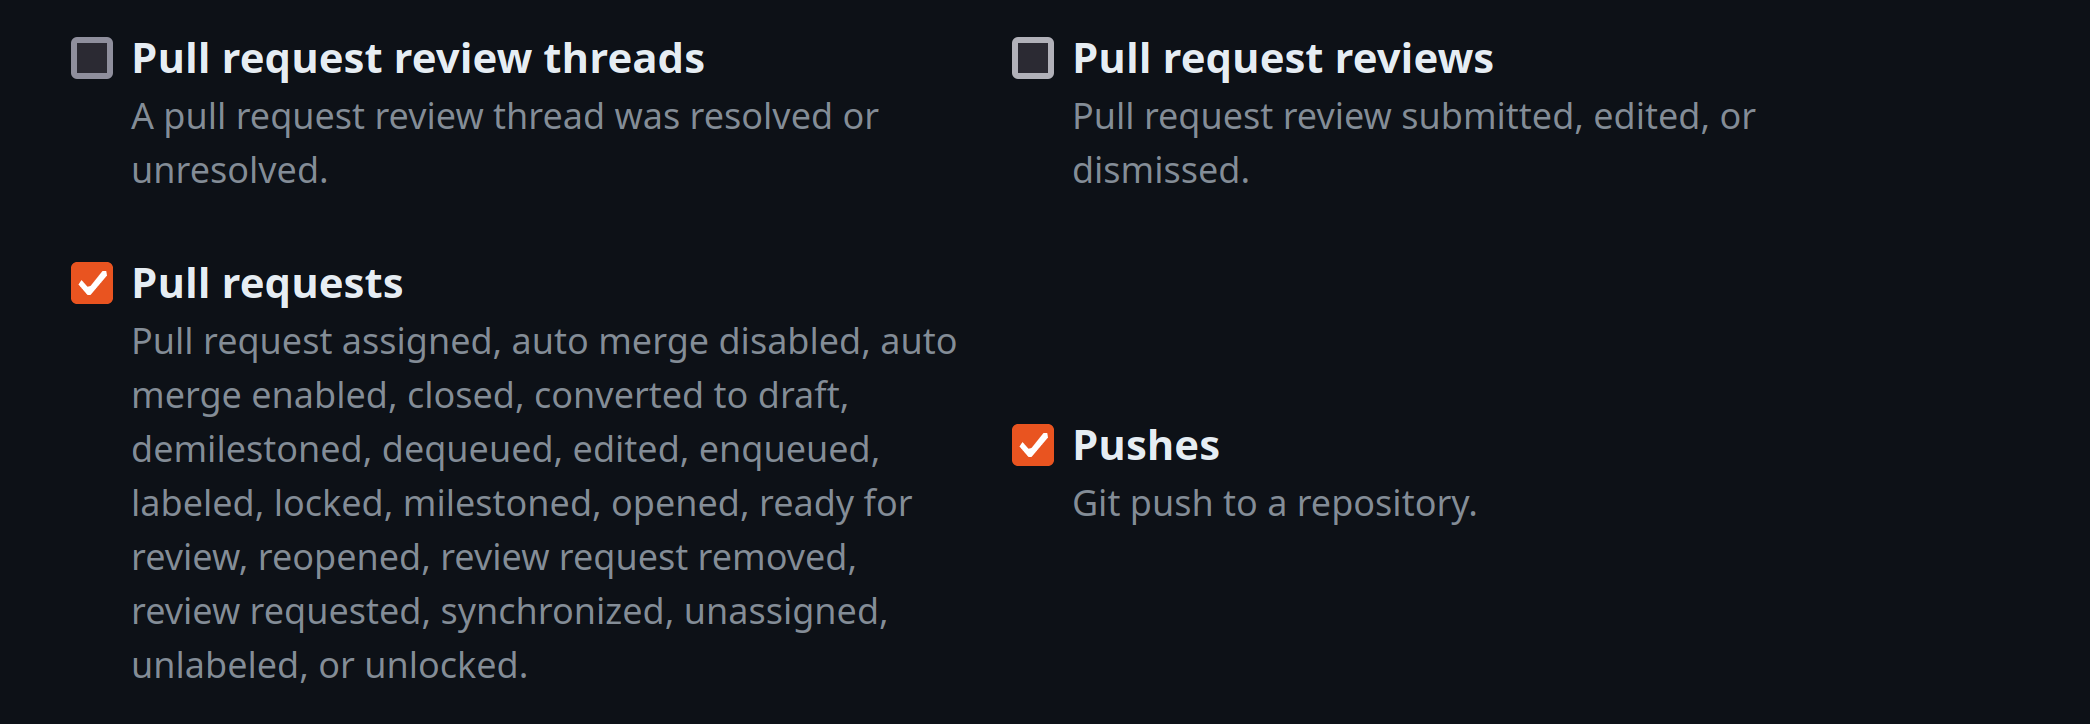
Since the Jenkins file is already written, all that is needed is to create a new pipeline project and configure a webhook so that the Jenkins Server receives a notification when a specified event occurs. In this case, the Jenkins Server is notified of pull requests and pushes. The Github plugin facilitates this by listening for events on http://ip_address:port/github-webhook/ where ip_address is the ip address of your jenkins Server and the port (default 8080) is the port the Jenkins Server is listening on. From the Github repository, settings are clicked, then navigated to the code and automation section on the left side, then “Webhooks” is clicked. This is where http://ip_address:port/github-webhook/ is specified as the “Payload URL” and then “Let me select individual events” is clicked to specify the events wanted.
If not already done, creating a personal access token in Github is necessary. This is used for setting up the two previously mentioned authentications.
To inform Jenkins of the repository and Jenkinsfile, thus facilitating the CI/CD pipeline, start from the Jenkins dashboard. Click “New Item,” enter the name of the pipeline, keeping in mind that the build stage of the Jenkinsfile may require adjustment if the project is named anything other than “pipeline.” After clicking the “Pipeline” button and then “OK,” proceed to the Build Triggers section. Here, it is essential to ensure that the “GitHub hook trigger for GITScm polling” box is checked. Under the Pipeline section, select “Pipeline script from SCM” to make the Jenkins Server aware of the repository.

Here are the authentication settings (remember, the password is your personal access token):
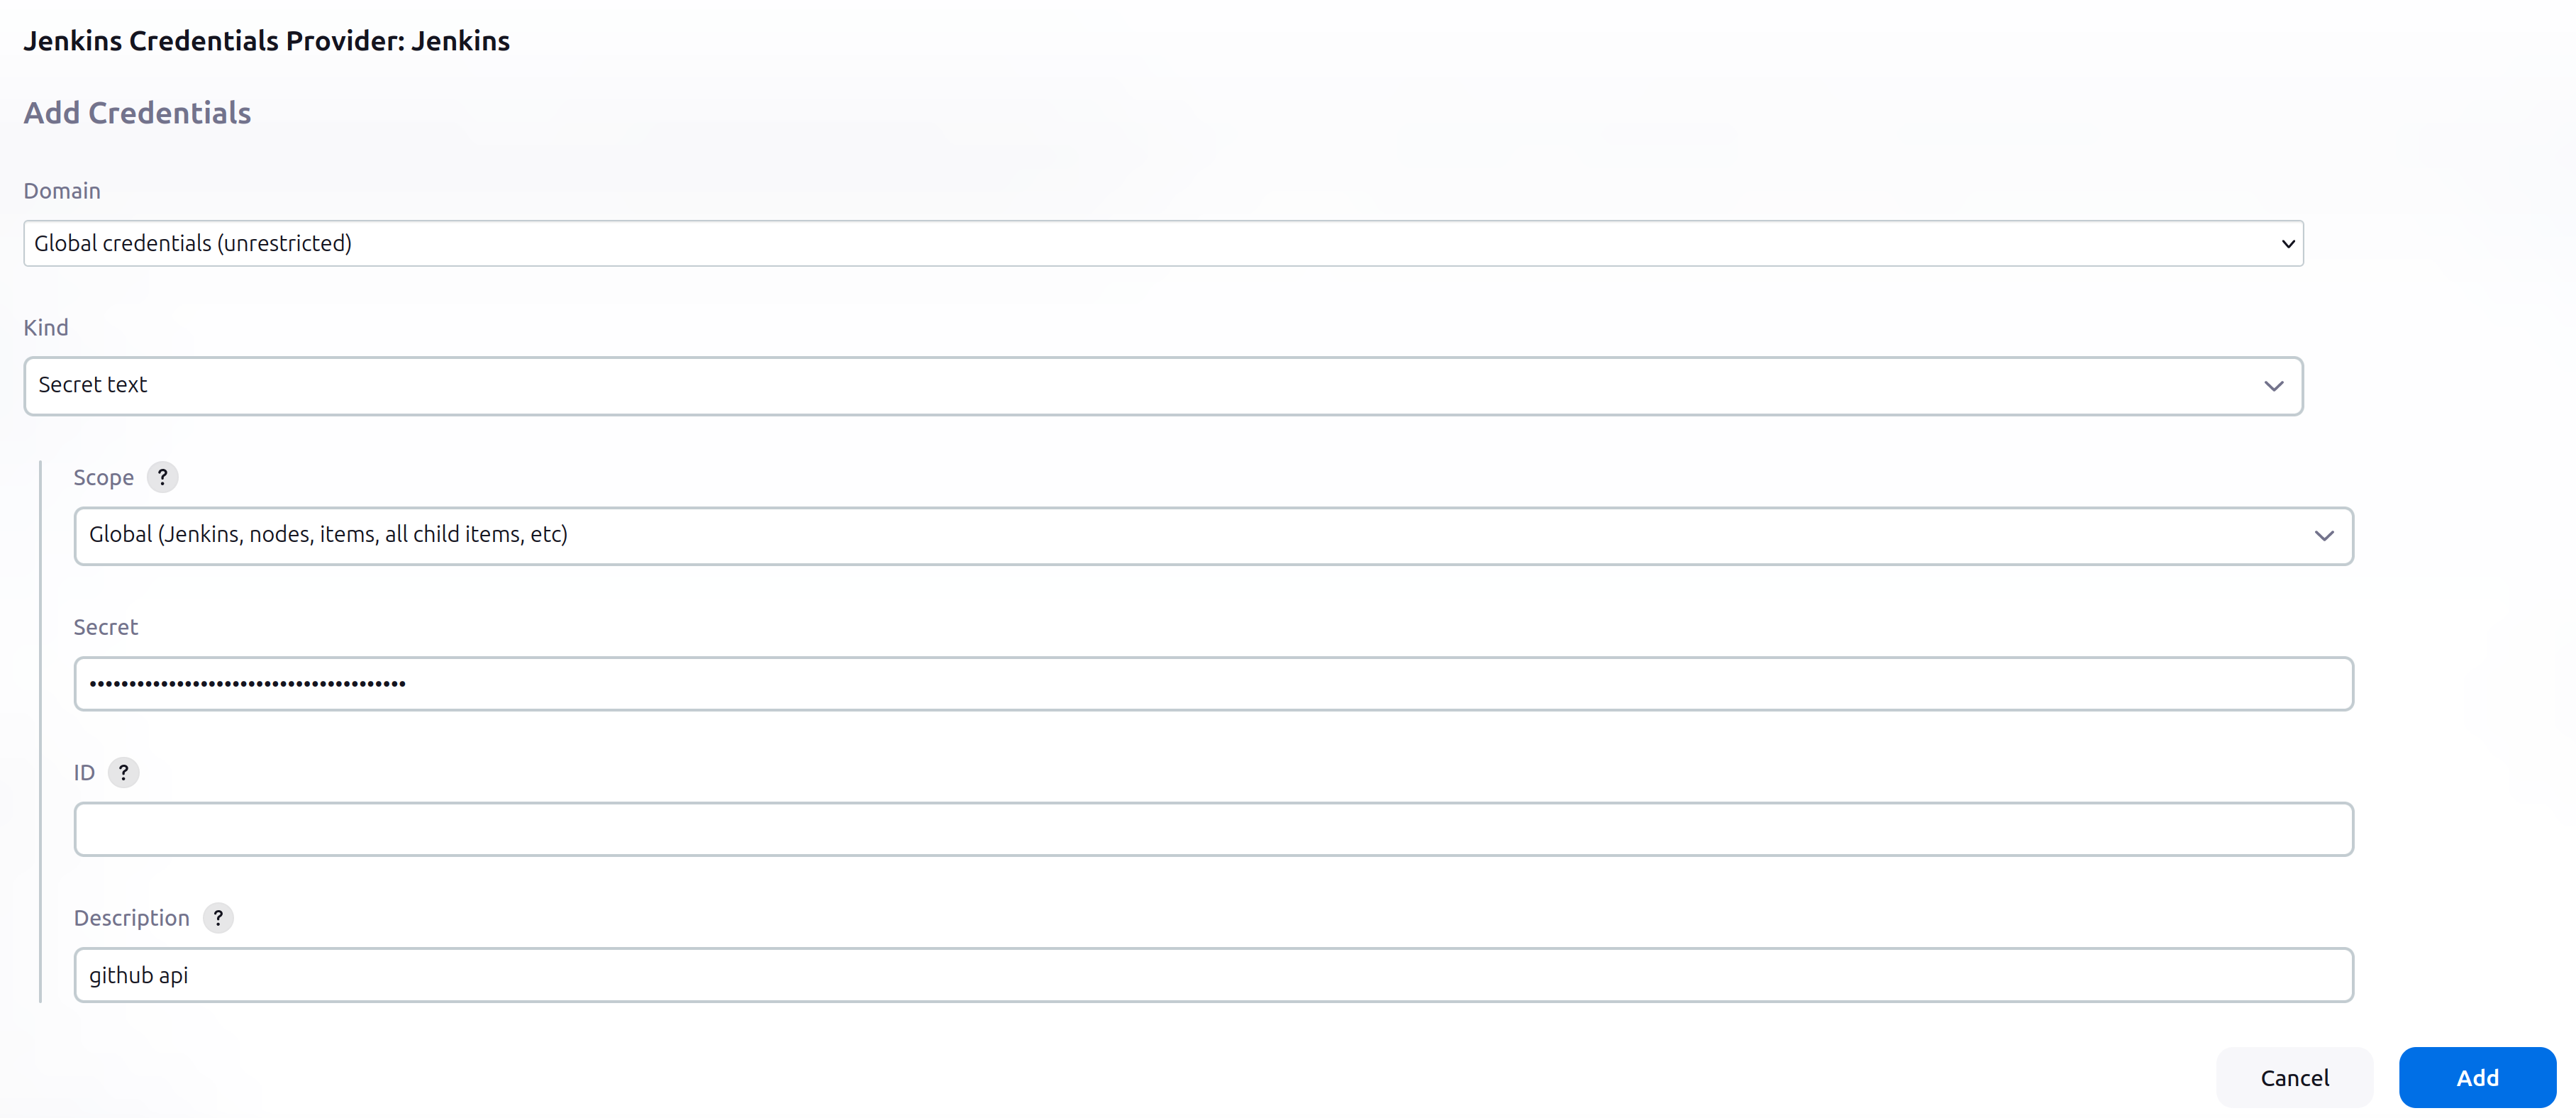
At this point, the CI/CD pipeline should be triggered and an agent should spawn on the Kubernetes Cluster after every commit. Before ensuring that everything is working, configuring authentication to the Github API to create commit statuses is still needed. From the dashboard > Manage Jenkins > System > scrolling down to the “Github” section and adding credentials is done. This time a “Secret text” is used to specify only the personal access token as this is the only thing needed to make calls to the Github API.
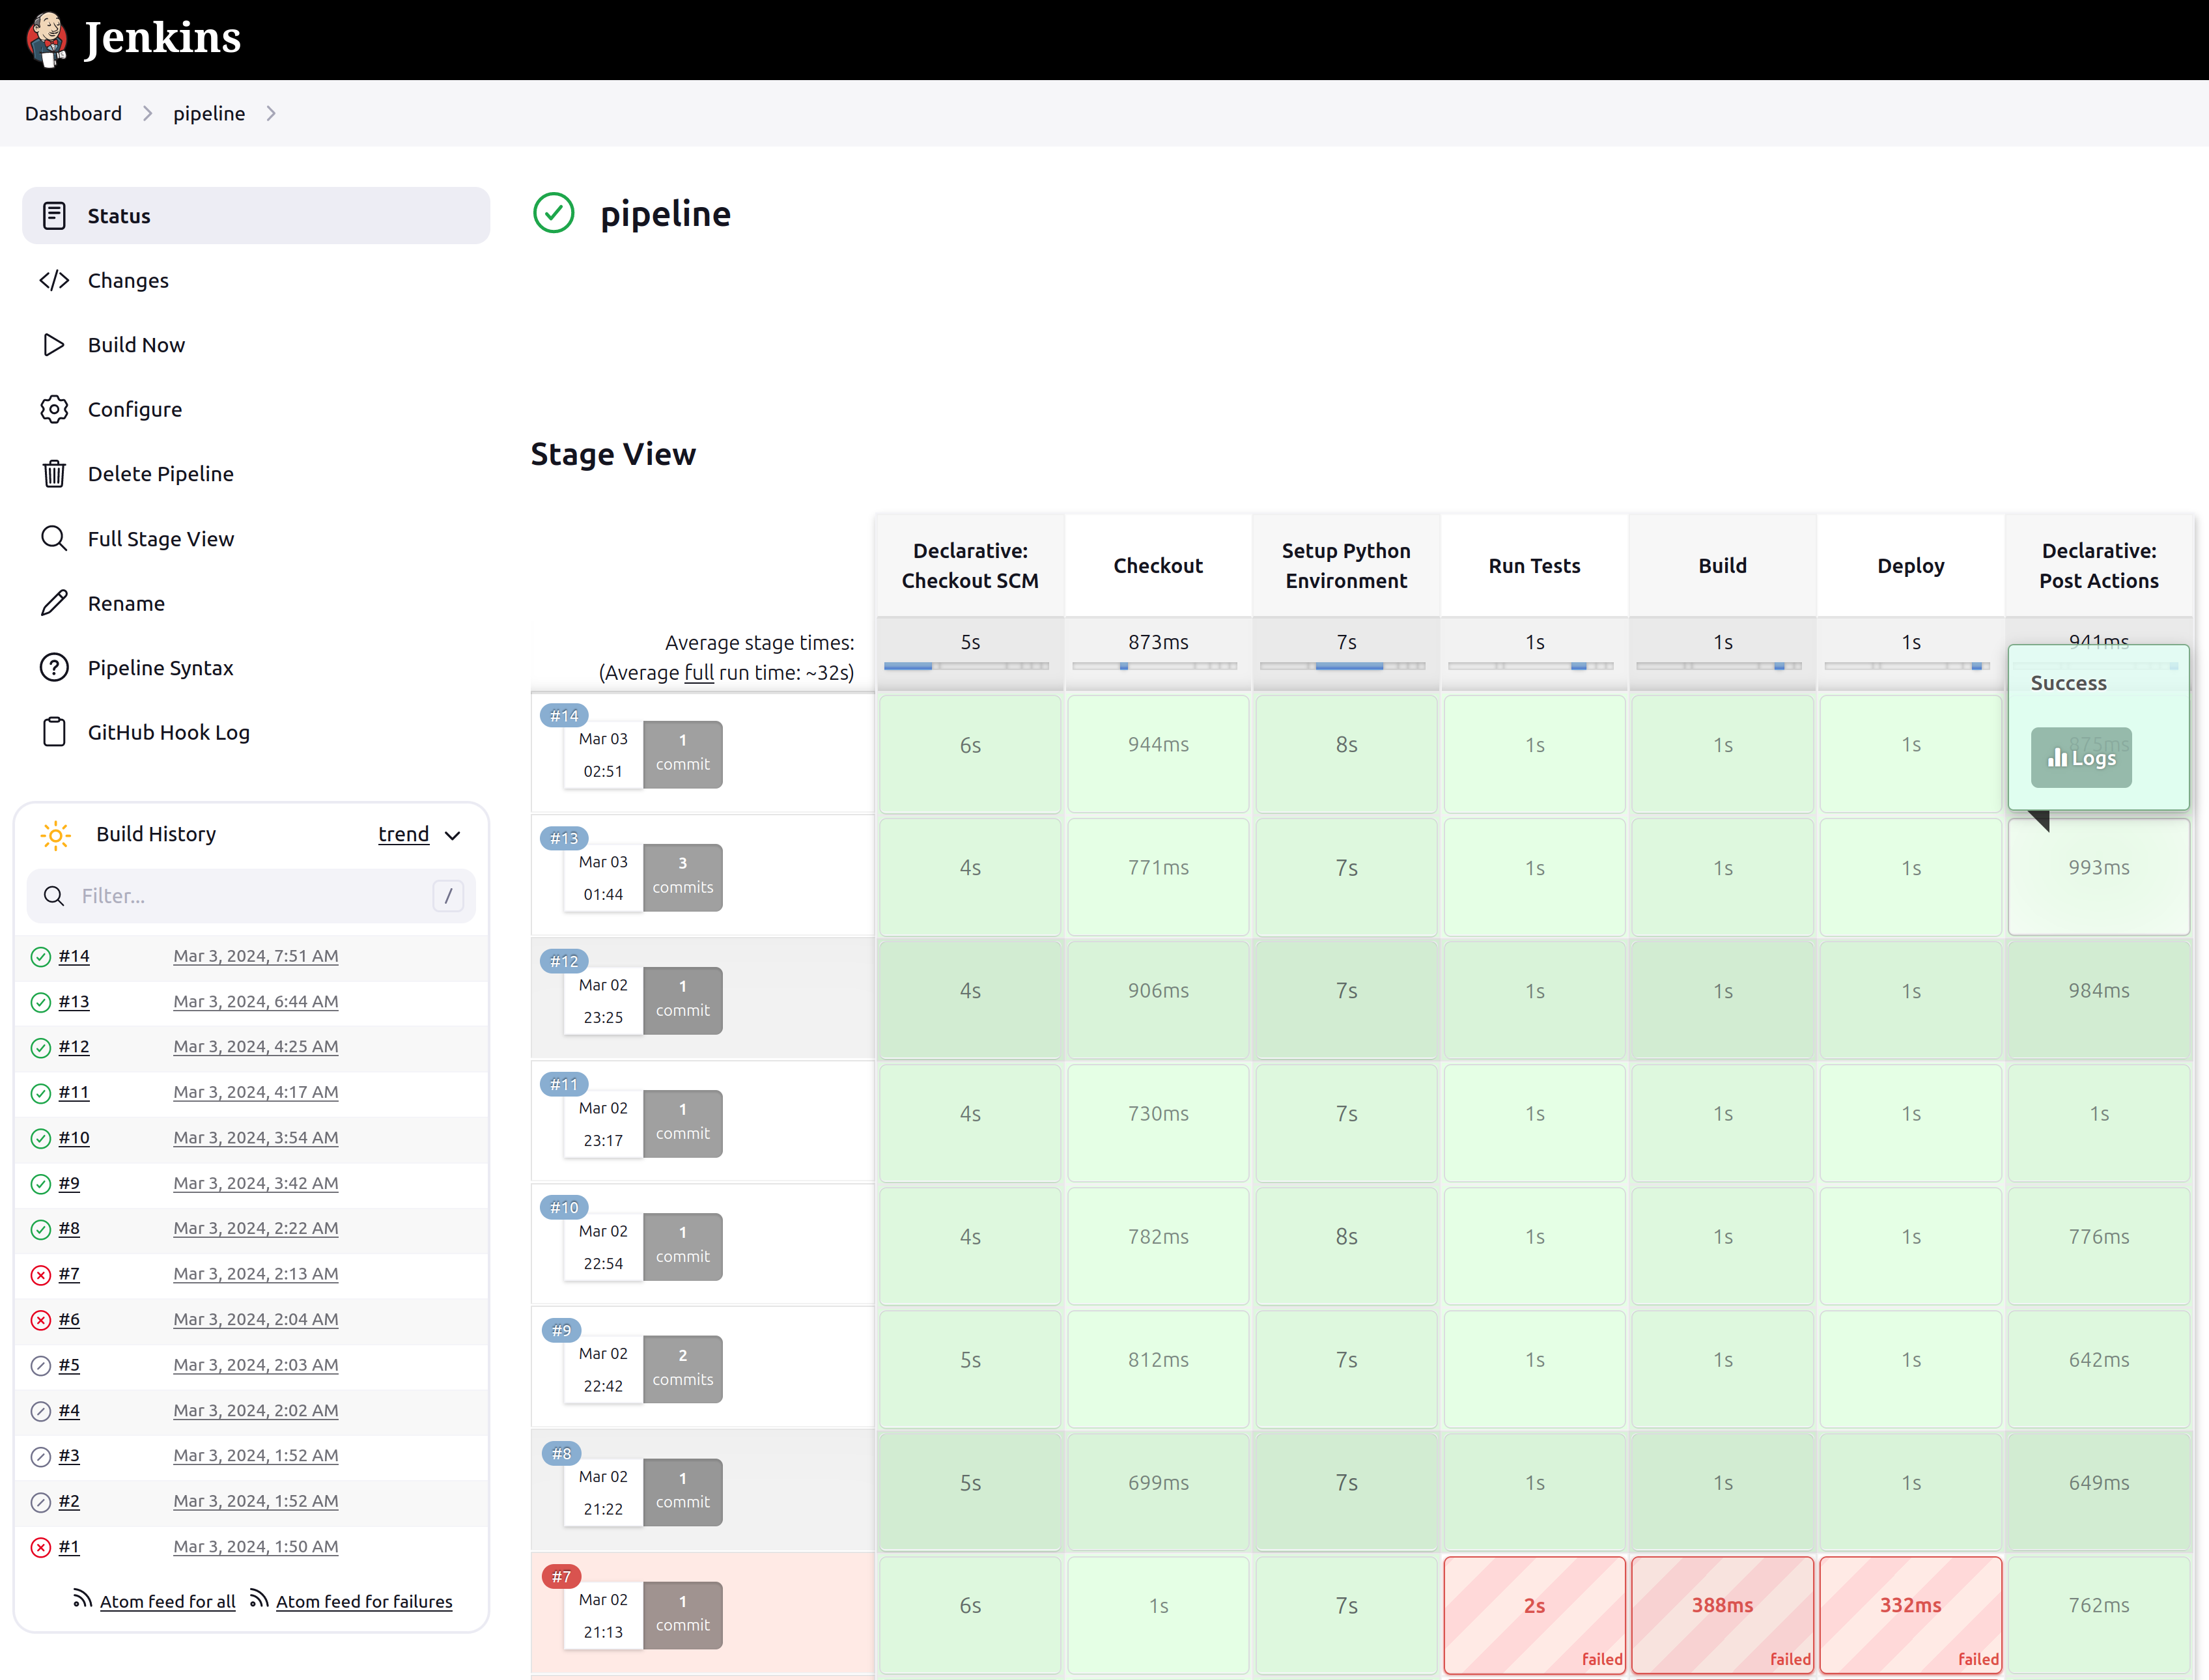
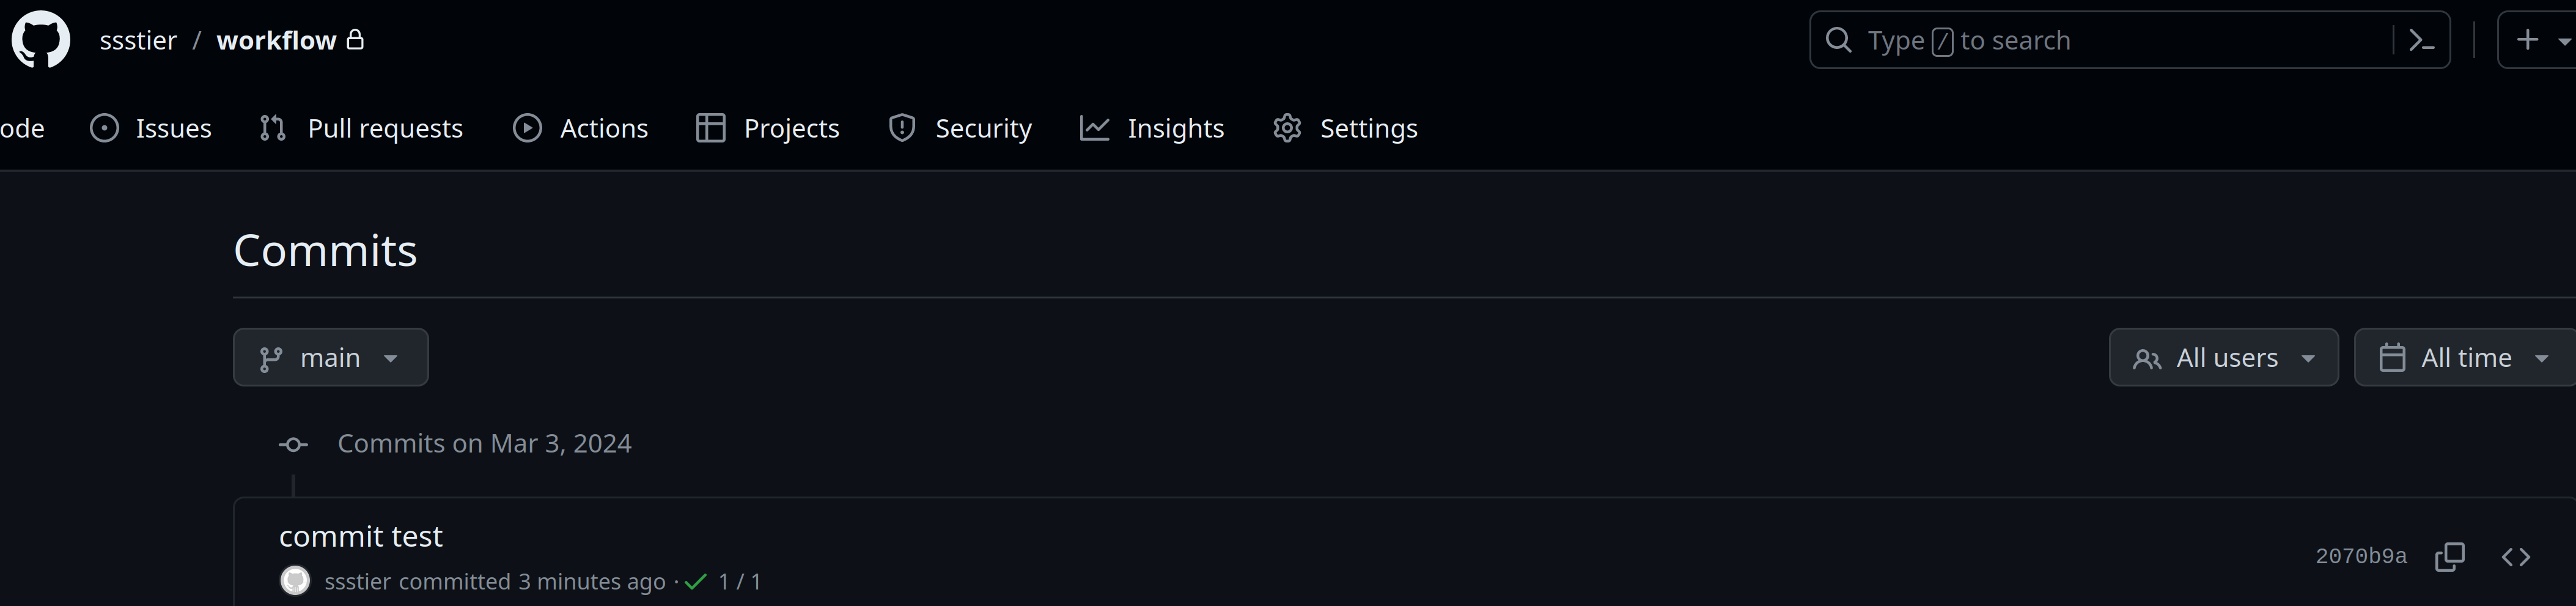
Everything should now be working! After making a commit, the pipeline run should automatically initiate a run. Each stage should be visible in real time and the commit status in the Github repository should show a status of whether the tests passed or failed.